# Working with Medical Inquiry

The MedInquiry application in Vault Medical provides a compelling, complete solution for case management with no third party integrations needed. _Medical Inquiry_ has three core capabilities:

  * Ingesting inquiries (via UI, email, and/or Vault API)
  * Assembling documents into a response package
  * Fulfilling inquiries directly from Vault

You can manage cases and case contacts, define priority-based service level agreements (SLAs), automatically generate standard response cover letters, assemble electronic response packages, and directly fulfill inquiries via email.

## Viewing Medical Inquiries

When you click the _Medical Inquiry_ tab, you can choose to view _Cases_ or _Case Contacts_. Cases contain all information about a request for information, while case contacts contain all contact information for the person who requested the information.

To view an individual case or case contact's details page, click on its **Name**. You can also <a href="/en/gr/442/">_Search, Filter,_</a> or <a href="/en/gr/23830/">_Create Custom Views_</a>.

## Creating a New Case {#creating-a-new-case}

Depending on your Vault's configuration, the steps for creating a new case may vary. If your Admin has enabled the _Case Intake_ form, you can enter details for the case, case contact, and case request from a single form. If your Admin has configured the _Medical Inquiry_ user interface, you can use it to capture the inquiry.

To create a new case:

  1. From the **Medical Inquiry** tab, select **Cases**.
  2. Click **Create**.
  3. Optional: Enter the **Requestor**. This is the person who is calling or sending an email, for example, a doctor's administrator.
  4. Enter the **Case Contact**. This is the doctor, pharmacist or other medical professional requesting the information. If the person requesting the information isn't listed as a case contact, you'll need to create a new case contact.
  5. Optional: Enter the **Case Origination Channel**. This is the method of contact.
  6. Enter the **Case Priority**, which determines how quickly the case contact must receive a response.
  7. Optional: Select a **Country**. This field determines the _Country_ listed on the [_Cover Letter_][2].
  8. Optional: If your Vault uses the _Case Intake_ form, and you also wish to create a Case Request, proceed to the <a href="/en/gr/52722/#case-request">_Case Request_</a> panel.
  9. Click **Save**, or, to create another case, click **Save + Create**.

### Creating Cases from Calls & Chats

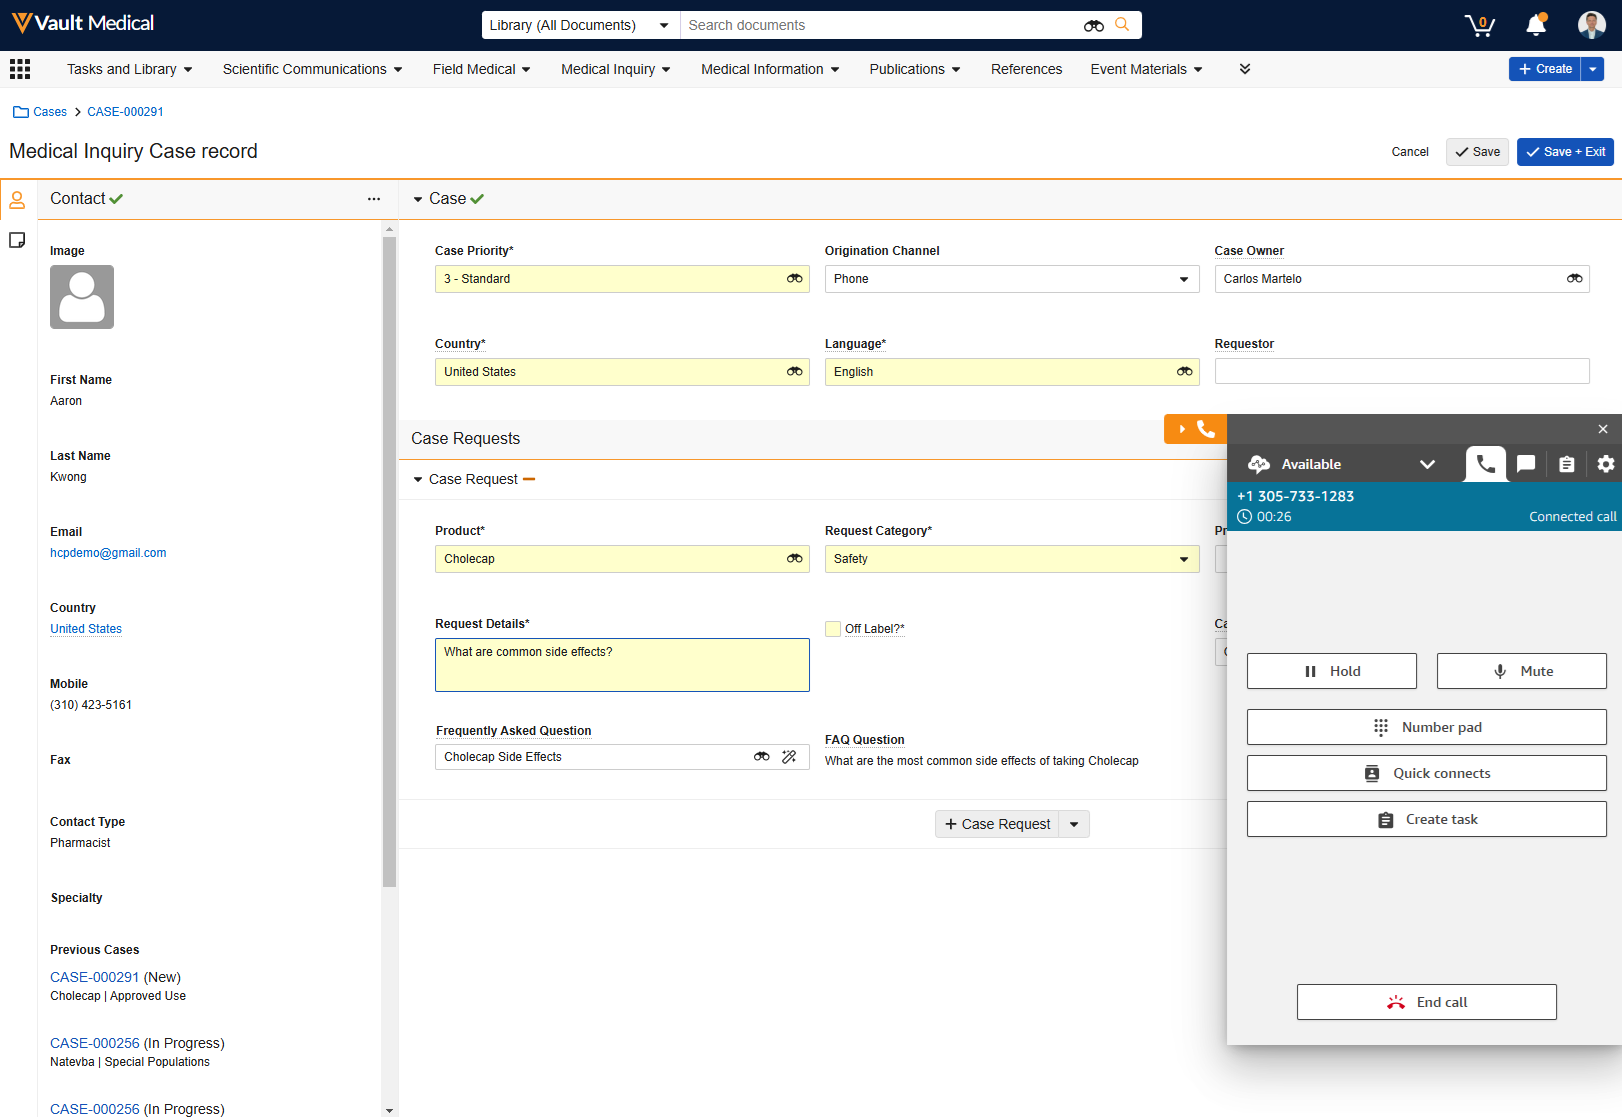
When <a href="/en/gr/52757/#telephony">configured</a>, you can receive calls in Vault using telephony support to create a case while communicating with the _Case Contact_. When you accept an inbound call or chat, Vault opens the _Case Intake_ form on the same browser tab where you accepted the call or chat. To make Vault open a new browser tab when accepting a call instead, contact <a class="external-link " href="https://support.veeva.com/hc/en-us" target="_blank" rel="noopener">Veeva Support<i class="fa fa-external-link" aria-hidden="true"></i></a>.

<a href="https://platform.veevavault.help/assets/images/Telephony_Support_24R3.png" data-lightbox="Telephony_Support_24R3.png" data-title="" data-alt="Telephony Support in Vault Medical">
  <img class="docimage" src="https://platform.veevavault.help/assets/images/Telephony_Support_24R3.png" alt="Telephony Support in Vault Medical" style="max-width: 60%;"  />
</a>

#### Initiating Outbound Calls

If <a href="/en/gr/52757/#outbound-telephony">configured by an Admin</a>, you can initiate outbound calls directly from the _Case_ or _Case Contact_ record.

On a _Case_ or _Case Contact_ record, click <img class="inline" src="https://platform.veevavault.help/assets/images/fas-phone-arrow-up-right.png" alt="Dial Icon" style="" /> to dial the phone number listed, or click <img class="inline" src="https://platform.veevavault.help/assets/images/fa-address-card.png" alt="Phone Book Icon" style="" /> to open the phone book. The phone number listed is the primary related _Phone_ record, if one is available. If not, Vault displays the _Case Contact_'s _Mobile_ field value. In the phone book, you can add and delete _Phone_ records and click <img class="inline" src="https://platform.veevavault.help/assets/images/fas-phone-arrow-up-right.png" alt="Dial Icon" style="" /> next to a phone number to initiate a call. 

When dialing from a _Case Contact_ record, the call must be related to an existing, open _Case_. When you click <img class="inline" src="https://platform.veevavault.help/assets/images/fas-phone-arrow-up-right.png" alt="Dial Icon" style="" /> to dial the phone number listed, the _Open Cases_ dialog appears, which lists all active _Case Requests_ related to the contact. You can select a _Case_ record and click **Dial** to initiate a call. 

### Response Contacts

If <a href="/en/gr/52757/#case-response-emails">configured by an Admin</a>, you can populate the **Response Contact** field on the **Case Response** and **Case** objects. When populated, Vault sends the case response email to this address. If the _Response Contact_ is present but empty, Vault defaults back to the email in the _Case Contact_ field.

### Selecting Case Contacts in the Enhanced Case Contact Dialog

When configured, you can search for _Case Contacts_ using HCO affiliations and address information and click on a _Case Contact_ to expand a search results row to display additional information, such as HCO affiliations, nonprimary phone numbers, email addresses, addresses, and fax numbers. You can select an HCO from the affiliations to add it to a _Case_. You can also sort the search results based on relevance, full name, alternate name, and last name, and sort the results in ascending or descending order. Vault will save your preferences if you change the _Sort by_ order.

<a href="https://platform.veevavault.help/assets/images/25r3-MedInquiry-Case-Contact-1.png" data-lightbox="25r3-MedInquiry-Case-Contact-1.png" data-title="" data-alt="Case Contact Dialog Search by HCO Affiliations">
  <img class="docimage" src="https://platform.veevavault.help/assets/images/25r3-MedInquiry-Case-Contact-1.png" alt="Case Contact Dialog Search by HCO Affiliations" style="max-width: 600px;"  />
</a>

<div class="note-border alert-info">
  <div class="alert alert-info" role="alert">
    <div><i class="far fa-info-circle"></i></div>
    <div class="alert-text">
      <p><strong>Note</strong>: This feature is currently available only to Early Adopters and must be requested via Veeva Product Support.</p>
    </div>
  </div>
</div>


### Selecting Case Contacts from OpenData in the Enhanced Case Contact Dialog

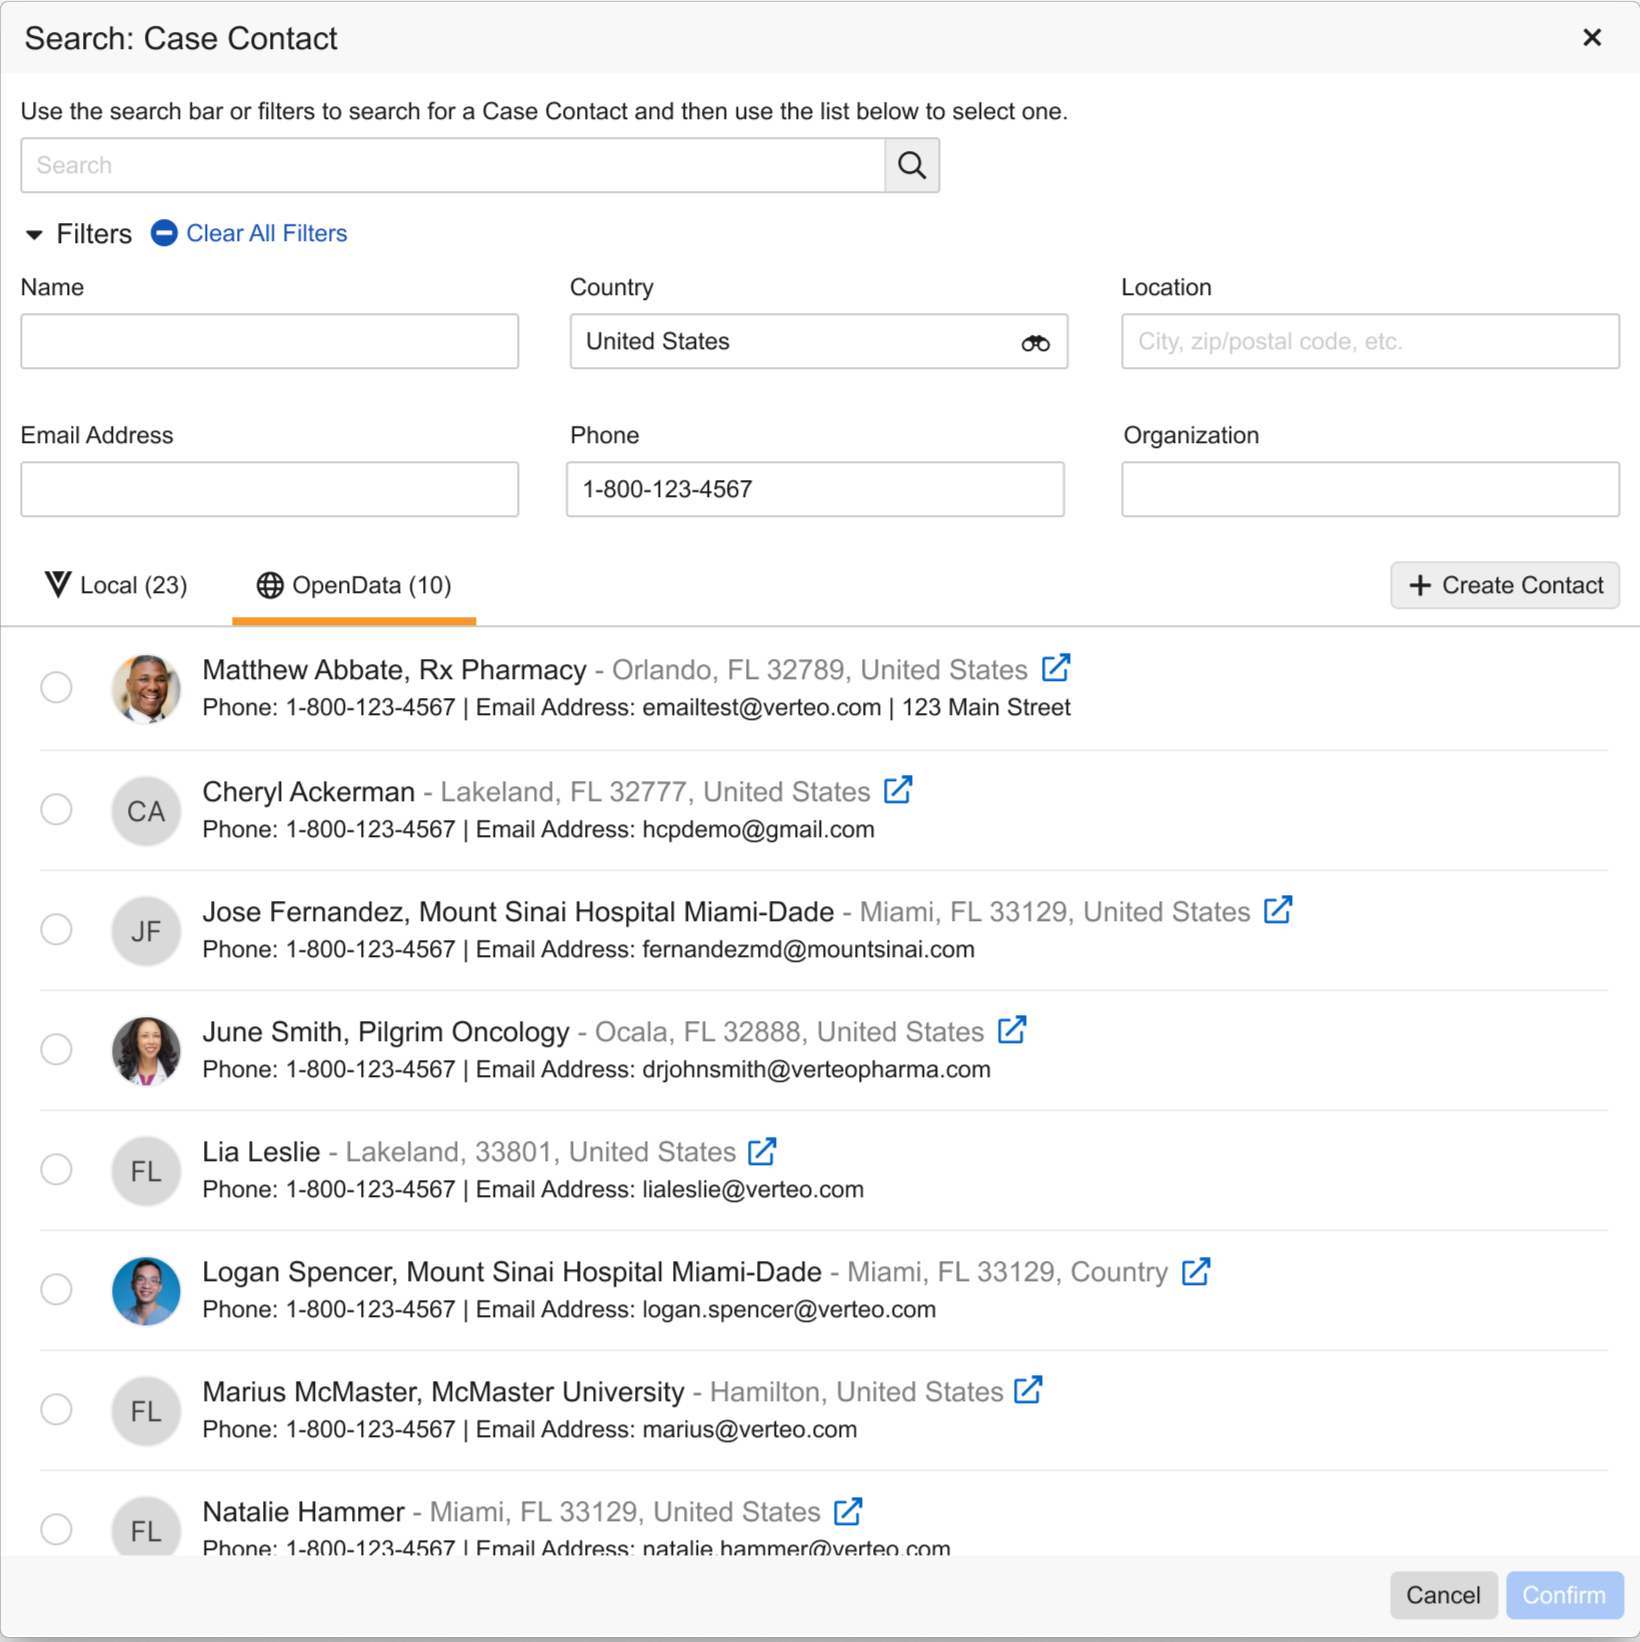
When configured, you can search for _Case Contacts_ using the OpenData Connection in the enhanced Case Contact dialog. If you select a _Case Contact_ that matches an existing record in Vault Medical, Vault updates the _Case Contact_ record. If you select a _Case Contact_ that does not match an existing record in Vault Medical, Vault creates a new _Case Contact_ record.

<a href="https://platform.veevavault.help/assets/images/25r3-MedInquiry-Case-Contact-2.png" data-lightbox="25r3-MedInquiry-Case-Contact-2.png" data-title="" data-alt="Case Contact Dialog Search by OpenData">
  <img class="docimage" src="https://platform.veevavault.help/assets/images/25r3-MedInquiry-Case-Contact-2.png" alt="Case Contact Dialog Search by OpenData" style="max-width: 600px;"  />
</a>


<div class="note-border alert-info">
  <div class="alert alert-info" role="alert">
    <div><i class="far fa-info-circle"></i></div>
    <div class="alert-text">
      <p><strong>Note</strong>: This feature is currently available only to Early Adopters and must be requested via Veeva Product Support. The <a href="/en/gr/52757/#medical-network-connection">Medical-Network Connection</a> also must be enabled.</p>
    </div>
  </div>
</div>


### Selecting Case Contacts from Vault CRM

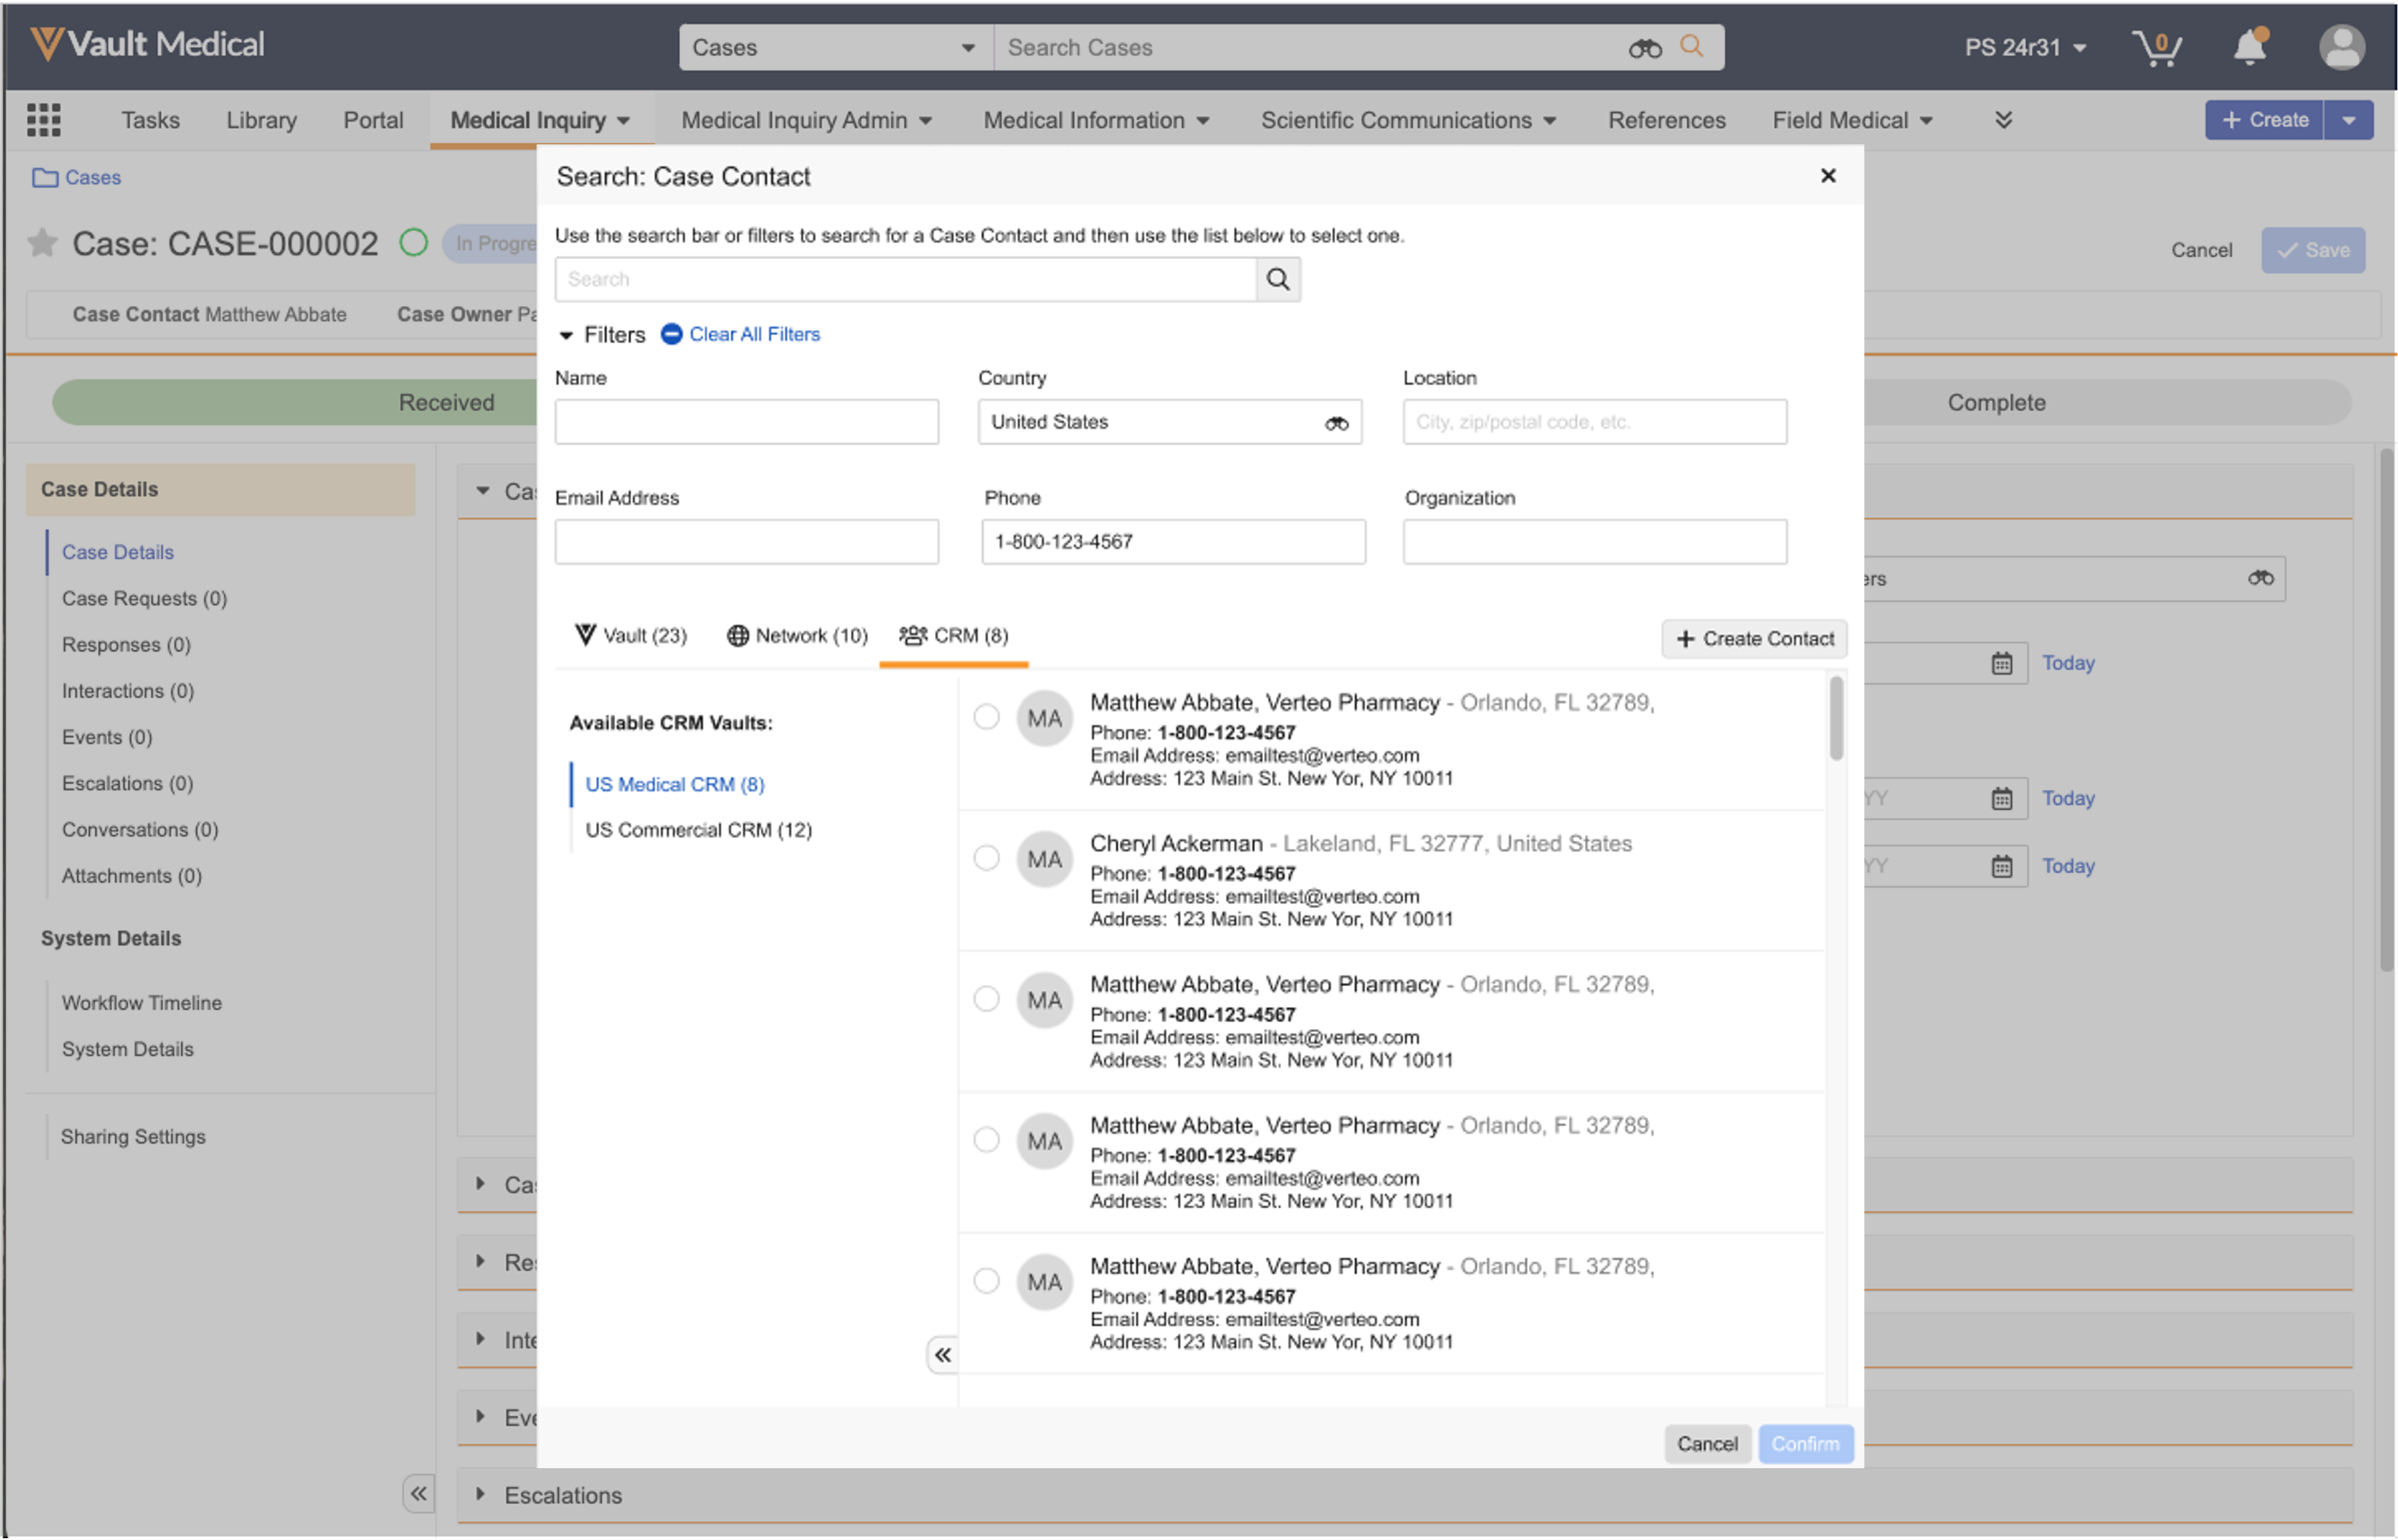
In Vaults with at least one <a href="/en/gr/879896/">Medical-CRM connection</a> configured, you can search and filter for _Case Contacts_ from Vault CRM by clicking the applicable tab in the _Search: Case Contact_ dialog. You must filter on the _Country_ field to view results from Vault CRM. 

If you select a _Case Contact_ that matches an existing record in Vault Medical, Vault updates the _Case Contact_ record. If you select a _Case Contact_ that does not match an existing record in Vault Medical, Vault creates a new _Case Contact_ record.

<a href="https://platform.veevavault.help/assets/images/MedInquiry_CRM_Lookup_25r2.png" data-lightbox="MedInquiry_CRM_Lookup_25r2.png" data-title="" data-alt="HCP Lookup from a connected Vault CRM">
  <img class="docimage" src="https://platform.veevavault.help/assets/images/MedInquiry_CRM_Lookup_25r2.png" alt="HCP Lookup from a connected Vault CRM" style="max-width: 60%;"  />
</a>

### Adding Adverse Events, Event Products, & Event Reactions

When creating a case, you can also capture core details of an _Adverse Event_ associated with the case, with the related <a href="/en/gr/52757/#event-products-reactions">_Event Products_ and _Event Reactions_</a>. An Admin must configure the _Case_ object <a href="/en/gr/26387/#how-to-access-page-layouts">page layout</a> to include these sections.

### Selecting a Frequently Asked Question

If <a href="/en/gr/52757/#configuring-faqsr">configured by an Admin</a>, Vault automatically matches inquiries to an applicable _FAQ_ record. You can also click the binoculars icon to open the **Browse Frequently Asked Questions** dialog and select a **Frequently Asked Question** and [**Standard Response**][3] Click <i class="far fa-external-link-alt"></i> to open the _FAQ_ or _Standard Response_ in a mini-browser window. If available, you can also click <i class="far fa-magic"></i> to suggest a matching _FAQ_ record.

When configured, you can click the **Actions** menu on the _Case Request_ and select **Suggest FAQ** to automatically identify a matching _FAQ_. This user action must be <a href="/en/gr/52757/#auto-sr">configured by an Admin</a>. Your Admin may also configure this action as an entry action so Vault automatically attempts to find the matching _FAQ_ and create the _Case Response_ based on the _Standard Response_ for inquiries captured through other channels, such as email, Veeva CRM, or webform. 

you can select an applicable **Frequently Asked Question** (FAQ) that aligns with the question asked in the Medical Inquiry. Business Admins can also <a href="/en/gr/52757/#add-faqsr">add **Frequently Asked Questions**</a>.

### Medical Inquiry Keywords

When <a href="/en/gr/52757/#keywords">enabled by an Admin</a>, you can view **Medical Inquiry Keywords** on the _Case Request_.

### Using FAQ Quick Search

If <a href="/en/gr/52757/#faq-quick-search">configured by an Admin</a>, when an HCP makes a medical inquiry, you can use the _FAQ Quick Search_ on a _Case_ record to search for and select _Frequently Asked Questions_ and provide the HCP with an associated _Standard Response_. This section is useful when users are not required to capture exactly what an HCP has asked in the medical inquiry.

When you enter a term, select the **Product Family** or **Local Product** filter, and click **Search**, Vault displays a list of _FAQs_ with the related _Standard Responses_ expanded for your review. Vault displays a **No Results Found** message if the keyword or term does not match any _FAQs_ or _Standard Responses_. Once you have provided a _Standard Response_ to an HCP, you can click the **plus (+)** icon next to the _Standard Response_ to automatically create _Case Request_ and _Response_ records for the inquiry or the _FAQ_ to automatically create a _Case Request_ record.

## Creating a New Case Contact

You can create a new case contact by navigating to **Medical Inquiry > Case Contacts** and clicking **Create**. Alternately, you can create a new _Case Contact_ record from the _Create Case_ screen by selecting **Create Person** and then selecting the **Case Contact** subtype. Enter the person's contact information, then click **Save**. You can also create new cases and case contacts from _Business Admin_.

### Adding Associated Contacts

You can add additional email addresses for a _Case Contact_ as _Associated Contacts_ in the _Associated Contact_ section of a primary _Case Contact_ record. You can include these addresses as _CC_ or _BCC_ recipients on case response emails or as different _Response Contacts_.

### Adding Case Contacts with the Medical-Network Connection {#network-case-contacts}

When <a href="/en/gr/52757/#medical-network-connection">configured</a> by an Admin, you can search OpenData using the Medical-Network Connection to create a _Case Contact_ record. You can search for healthcare professionals using names, NPI, specialty, and more. You can also use this search UI to find existing case contacts. If you select an OpenData contact that matches an existing _Case Contact_ record, Vault updates the record.

To create a case contact using Medical-Network Connection:

  1. Click the binoculars in the _Case Contact_ field.
  2. Using the search bar and filters, enter information on the HCP.
  3. Click **Search**.
  4. Select the result closest to your search terms.
  5. Click **Confirm**.

When importing an HCP from OpenData, Vault creates a _Case Contact_ and, if present, a _Person Address_ record. Vault manages this _Case Contact_ record, preventing potential conflicts if an HCP's details are updated on the _Case Contact_ record in the future.

<div class="note-border alert-info">
  <div class="alert alert-info" role="alert">
    <div><i class="far fa-info-circle"></i></div>
    <div class="alert-text">
      <p><strong>Note</strong>: You cannot use formula fields as search criteria in the search UI.</p>
    </div>
  </div>
</div>


You can continue to manually create case contacts by clicking **Create** under the _Case Contact_ field. You can also search for existing _Case Contact_ records in Vault by entering the person's name in the _Case Contact_ field.

### Adding Phone or Fax Numbers for Case Contacts

If <a href="/en/gr/52757/#phone-field-control">configured by an Admin</a>, you can add phone or fax numbers to a _Case Contact_ record, and Vault displays the phone or fax number in the correct international phone or fax number standard format based on the selected country..

To add a phone or fax number:

1. Under _Case Contact Details_, select **Phone Numbers** and then click **Create** to create a _Phone_ or _Fax_ record.
2. In the _Phone_ field control, select the country phone code, and add a phone or fax number for the _Case Contact_ record. Vault automatically displays the number in the correct format based on the selected or prepopulated country.
3. Click **Save** or click **Save + Create** to add another number.

## Adding the Case Request {#case-request}

The _Case Request_ stores information about the inquiry. To add a _Case Request_ to a _Case_:

  1. From the _Case Detail_ page, click the **Create** button in the **Case Requests** panel. If your Vault uses the _Case Intake_ form, you may skip this step and create the _Case Request_ at the same time as the _Case_.
  2. Select the **Product Family**.
  3. Select the **Request Category**.
  4. Enter the **Request Details**. This is a summary of the questions asked or information requested by the _Case Contact._
  5. Optional: Select the **Preferred Response Method**.
  6. Optional: If your Vault uses the _Case Intake_ form and you wish to also create a _Case Response_, proceed to the <a href="/en/gr/52722/#case-response">_Case Response_</a> panel.
  7. Click **Save**.

You can add multiple case requests to each case. For example, a case contact might need information about both efficacy and dosing for the same product or have questions about multiple products that were asked in the same conversation with a call center agent.

## Assigning a Case

From the **Case Detail** page, click the **Actions** menu and select **Assign Case**. You can select the assignee from the list or search using their name or email. Click **Start** when you're done selecting. Assigning a case starts the _Case Assignment_ workflow.

### Automatically Creating Case Requests from Emails

When <a href="/en/gr/52757/#automated-email-intake">configured by an Admin</a>, Medical leverages the <a href="/en/gr/74285/">_Email to Vault_</a> feature to receive emails directly and store them as an _Email_ object record. Vault users can leverage this functionality to automate the Medical Inquiry intake process. Once configured, Vault can receive emails from HCPs and automatically create a new inquiry or add to an existing record. Depending on your Vault's configuration, emails may be either automatically redirected or manually forwarded to Vault.

## Responding to a Case {#case-response}

When you are assigned a case, it will appear in the **Tasks** tab. Open the Case by clicking on its **Name**, click the **Accept** button, then click **Complete**.

### Adding the Case Responses

If your Vault uses the _Case Intake_ form, you can add the **Case Response Type** in the _Case Response_ panel of the form, then proceed to step 4 below:

  1. From the _Case_ detail page, select a **Case Request.**
  2. Click the **Create** button in the **Case** **Responses** panel.
  3. Select a **Response Type** from the picklist in the pop up, then click **Continue**.
  4. Click **Save**. 
{: #fdocs}
To add fulfillment documents:

  1. From the _Case Request_ page, click on the name of the **Case Response**.
  2. Click the **Add** button in the _Fulfillment Documents_ panel. In the _Fulfillment Documents_ dialog, you can search for documents using the search bar and apply filters. By default, Vault applies a _Steady State Only_ filter. Admins can disable this filter by updating the Criteria VQL configured on the _Document_ field of the _Fulfillment Document_ object. Vault also applies _Product_, _Country_, and _Language_ filters if those fields are populated. You can also click <i class="fas fa-external-link-alt"></i> to open a document.
  3. Select the documents to include and the order in which you would like the document to appear in the response package.
  4. Click **Add**.

To reorder fulfillment documents, click **Reorder**. You can drag and drop the documents into the desired order or click <i class="fas fa-sort-up"></i> **Move up**, <i class="fas fa-sort-down"></i> **Move down**, **Move to first**, or **Move to last**.

You can add a maximum of 100 fulfillment documents per _Case Response_ record.

<div class="note-border alert-info">
  <div class="alert alert-info" role="alert">
    <div><i class="far fa-info-circle"></i></div>
    <div class="alert-text">
      <p><strong>Note</strong>: Vault displays an error when you attempt to add duplicate fulfillment documents to a <em>Case Response</em>. Additionally, the <em>Generate Response Package</em> and <em>Generate Preview Response Package</em> actions fail if the documents included in the package are not unique.</p>
    </div>
  </div>
</div>


#### Adding Multiple Responses

HCPs often submit multiple requests for medical information in one inquiry. When configured by an Admin, you can bundle multiple answers in one _Case Response_ instead of answering and sending a response package for each individual request. This _Response_ includes links to each individual answer.

Depending on your Vault's configuration, you can perform one or more of the following actions:

  * _Case_ object
    * **Create Case Response**: This user action creates a _Case Response_ record from the _Case_. Admins must configure the type of _Case Response_ created. When the action executes, the _Case Response_ created automatically includes all _Responses_ associated with the _Case_ in the _Ready for Fulfillment_ lifecycle state.
  * _Case Request_ object
    * **Create Case Response:** This user action functions similarly to the one above, but from the _Case Request._ When the action executes, the _Case Response_ created automatically includes all _Responses_ associated with the _Case_ in the _Ready for Fulfillment_ lifecycle state.
  * _Case Response_ object
    * **Create Case Response:** This user action functions similarly to the one above, but from a _Case Response_ with the _Response_ type. When the action executes, the _Case Response_ created automatically includes the _Response_ from which it was created, as long as the _Response_ is in the _Ready for Fulfillment_ lifecycle state.
    * **Add/Remove Responses**: This user action opens a dialog where you can add or remove the _Responses_ you would like to include in a _Fulfillment_.
    * **Update Response List**: This user and/or entry action updates the _Response List_, which is the list of _Responses_ to be included in a _Fulfillment_. You can then use the _Response List_ in emails and cover letters.

### Generating a Cover Letter {#cover-letter}

You can create a cover letter by clicking _Generate Cover Letter_ in the **Actions** menu on the _Case Response_ detail page.

### Generating a Response Package

You can complete the following tasks from the **Actions Menu** on the _Case Response_ detail page:

  * _Generate Cover Letter_ creates a form letter to the case contact with details about the response package.
  * _Email Response_ sends the response package to the case contact. Note that Email Response is only available if the _Case Response Type_ is _Email_ and if you have either generated a response package or if you have entered _Response Notes_.
  * _Generate Preview Response Package_ allows you to see what the response package will look like before you actually generate one and allows you to preview non-steady state documents.
  * _Generate Response Package_ creates the final version of the response package and requires that the cover letter and all fulfillment documents are in a steady state. Vault sends the final response package to the case contact and allows them to view the cover letter and fulfillment documents. The response package only includes documents in their steady state. If a document moves out of its steady state, it will not be included in the response package.
  * _Change Type_ allows you to change the method of response. For example, you could change a response from fax to email.
  * _Compose Email_ generates a case response email based on a template. This user action must be <a href="/en/gr/52757/#case-response-email-templates">configured by an Admin</a>.

### Selecting Case Response Templates

When <a href="/en/gr/52757/#case-response-email-templates">configured by an Admin</a>, you can select an email template for a case response. Vault determines the list of templates based on configured constraints, such as the _Country_, _Language_, and _Product Family_ fields on the _Case Response_ record. Your Admin may also configure a default template based on these fields.

### Generating & Attaching Case Reports to Case Responses & Events

When <a href="/en/gr/52757/#case-reports">configured by an Admin</a>, you can perform the **Generate and Attach Case Report** user action on the _Event_ and _Case Response_ objects to generate and attach the case report based on the parent _Case_ record. Your Admin may also configure this action as an entry action. Vault generates the case report asynchronously, and notifies you via the Notification bell and email. 

### Allowing Document Downloads

You can also allow HCPs to download the documents from the response package. To enable this, select either the **Allow Document Download** or **Allow Source Document Download** checkbox on the _Case Response Detail_ page. An Admin must configure the page layout to include this section.

### Adding Fulfillment Documents & Attachments

When <a href="/en/gr/52757/#ad-hoc-docs">configured by an Admin</a>, you can add a maximum of ten fulfillment documents and attachments to a response by expanding the _Fulfillment Documents_ section on a _Case Response_ record, clicking **+ Add**, and selecting either **Document** or **Attachment**.

### Adding Recipients to Case Responses

You can _CC_ or _BCC_ additional email addresses by adding them in the **CC/BCC** section. You can also set a centralized email address as the **Reply To** address. An Admin must <a href="/en/gr/26387/#how-to-access-page-layouts">configure the page layout</a> to include this section. <a href="/en/gr/52757/#auto-cc-bcc">Your Admin may also configure</a> Vault to add CC and BCC recipients automatically or as a user or entry action.  

### Selecting a Case Response From Email Address

When <a href="/en/gr/52757/#outbound-email">configured by an Admin</a>, you can choose from which email address the response package is sent by clicking the _From_ drop-down and selecting an address.

###  Selecting a Standard Response {#standard-response}

If <a href="/en/gr/52757/#configuring-faqsr">configured by an Admin</a>, when you select an _FAQ_ during case creation, Vault automatically suggests the _Standard Response_ on the newly created _Case Response_. If Vault does not automatically populate this field, you can click the binoculars icon to open the **Browse Standard Responses** dialog and select a **Standard Response** that answers the **FAQ** selected on the _Case Request_. _Standard Responses_ must be <a href="/en/gr/52757/#add-faqsr">configured by an Admin or Business Admin</a>. Your Admin may also configure this action as an automatic entry action for cases captured through alternate channels.

Depending on your Vault configuration, you can also initiate a workflow or change the state to automatically generate an email with the _Standard Response_.

### Assigning Case Contact User Tasks

You can assign tasks to users (for example, translating a response document or creating new content.) To create a new task, click the **Create** button in the _Create Case Content User Task_ panel on the _Case Detail_ page.

### Sending a Response Package for Approval

You can request approval for a response package from the **Actions** menu on either the _Case Response_ _Detail_ page or from the small **Actions** menu next to the case name on the _Case Response Detail_ page. Select **Send Response Package for Approval**, then select the person or group to approve the response package.

### Approving a Response Package

You can see response packages assigned to you for approval in the **Tasks** tab. To approve a response package:

  1. Click on the link in the _Task Notification_.
  2. From the _Case Response Detail_ page, click the **Accept** button after reviewing all documents.
  3. After you have come to an approval decision, click **Complete** and select a verdict.
  4. Click **Complete**.

You must be assigned to an _Approver_ role to complete this action.

### Sending a Response Package and Closing a Case

To send a response package to the _Case Contact_ after an approver has approved it, select **Send Response Package** from the **Actions** menu on the _Case Detail_ page. When the email is sent, Vault creates a _Case Response Email_ record to store the its details. 

<div class="note-border alert-info">
  <div class="alert alert-info" role="alert">
    <div><i class="far fa-info-circle"></i></div>
    <div class="alert-text">
      <p><strong>Note</strong>: When configured by an Admin, Vault renders the body of the <em>Case Response Email</em> record exactly as the sent email appears. To enable this, your Admin must configure the <code class="language-plaintext highlighter-rouge">email_html_view_only_field__v</code> component on the <code class="language-plaintext highlighter-rouge">message_body_v</code> field of the <em>Case Response Email</em> layout, such as
<code class="language-plaintext highlighter-rouge">&lt;vault:field reference="message_body__v" component="email_html_view_only_field__v" /&gt;</code>.</p>
    </div>
  </div>
</div>


Vault tracks emails to ensure the successful delivery of response packages to _Case Contacts_. If Vault is unable to deliver the response package email, Vault sends a notification with the reason for the failure to the user who sent the response package. To enable these notifications, an Admin must select the _Enable Email Tracking_ option in **Admin > Settings > Application Settings**.

#### Closing a Case

Once you send the response package, you can close the _Case_. You must ensure that each _Case Request_ record related to the _Case_ is in the **Complete** state before changing the _Case_ record state to **Closed**.

### Viewing Sent Emails

Sent emails are stored in the _Case Response Email_ object.  Users can see these emails in the _Case Response Emails_ section of the _Case Response_ object record, once the response is sent. The email body shows the body of the email that the Case Contact received. Links are disabled in the email body.

### Deleting Case Response Emails

Users with the _Delete Case Response Emails_ permission can click the **Actions** menu and select **Delete Email** to delete _Case Response Email_ object records from Vault.

### Revoking Case Response Links

When configured by an Admin, you can click the **Actions** menu and select **Revoke Response Link** to revoke access to the _Response Document_ link. Your Admin may also configure an entry action on the _Standard Response_ lifecycle to automatically revoke response links.

### Tracking Cover Letter & Fulfillment Document Views

Veeva MedInquiry tracks when the documents in a response package are viewed via the _Response Document Link_. 

Vault tracks the number of external views and downloads in the related _Response Document Access_ record and displays the count in the [Fulfillment Document Picker][4] or a _Related Object_ section of the layout. Vault uses a daily job to update the number of external views and downloads.

## Automatically Sending Emails

If your Admin configures <a href="/en/gr/52757/#auto-case-response">automatic response package creation</a>, Vault creates and sends responses to HCPs when the _Case Response_ records enter a configured lifecycle state. 

For example, Vault can automatically compose and send a _Case Acknowledgement Email_ to a _Case Contact_ when a _Case_ enters the _In Progress_ state.

## Exporting Adverse Events to External Systems

Click **Generate E2B Report** from the **Action** menu on an _Adverse Event_ record in the _New_ state to generate an E2B(R3) Individual Case Safety Report XML file. You can use the file to export the Adverse Event to external safety systems. After generating the E2B(R3) file, you can download the report and load it into your safety system manually or pull the XML file directly into the safety system using the Vault API. 

<div class="note-border alert-info">
  <div class="alert alert-info" role="alert">
    <div><i class="far fa-info-circle"></i></div>
    <div class="alert-text">
      <p><strong>Note</strong>: The exported E2B report only includes standard fields on <em>Adverse Event</em> records and, if configured, <em>Event Reactions</em> and <em>Event Products</em>. Custom fields are not included.</p>
    </div>
  </div>
</div>


The E2B(R3) Individual Case Safety Report document is created in the _Generated_ state of the _Event_ object lifecycle. Creating the file also moves the corresponding Adverse Event record to the _E2B Report Generated_ state. To maintain consistency between the object record and the document, users cannot edit the record in this state. To edit the record, users must move the record to the _New_ state. This will move the E2B Report into the _Requires Regeneration_ state. When you perform the _Generate E2B Report_ user action again, Vault creates a new file in the _Generated_ state.

This feature is intended to share core information about the _Adverse Event_ with an external safety system.  As a result, Vault supports a subset of fields defined in the E2B(R3) standard.  Vault does not create E2B(R3) files to submit to a regulator. You must create the E2B(R3) files in your external safety system. 

The core fields supported are:

| Field | Type/Info | E2B Mapping |
| --- | --- | --- |
| _Date of Creation_ (`date_of_creation__v`) | DateTime | C.1.2 |
| _Type of Report_ (`type_of_report__v`) <br> _Adverse Event Report Type_ object with records: <br>\- _Spontaneous Report_ (`spontaneous_report__v`) <br>\- _Report from Study_ (`report_from_study__v`)<br>\- _Other_ (`other__v`) <br>\- _Not Available to Sender_ (`not_available_to_sender__v`) | Object | C.1.3 |
| _Date First Received from Source_ (`date_first_received_from_source__v`) | DateTime | C.1.4 |
| _Date of Most Recent Information_ (`date_of_most_recent_information__v`) | DateTime | C.1.5 |
| _Are Additional Documents Available?_ (`are_additional_documents_available__v`) | Yes/No | C.1.6.1 |
| _Reporter's Given Name_ (`reporter_given_name__v`) | Text (60) | C.2.r.1.2 |
| _Reporter's Family Name_ (`reporter_family_name__v`) |    Text (60) | C.2.r.1.4 |
| _Reporter's Street_ (`reporter_street__v`) | Text (100) |    C.2.r.2.3 |
| _Reporter's City_ (`reporter_city__v`) | Text (35) | C.2.r.2.4 |
| _Reporter's State or Province_ (`reporter_state_or_province__v`) | Text (40) | C.2.r.2.5 |
| _Reporter's Postcode_ (`reporter_postcode__v`) | Text (15) | C.2.r.2.6 |
| _Reporter's Telephone_ (`reporter_telephone__v`) | Text (35) | C.2.r.2.7 |
| _Reporter's Country_ (`reporter_country__v`) <br> Refers to the _Country_ object |    Object (_Country_) |    C.2.r.3 |
| _Reporter's Qualification_ (`reporter_qualification__v`) <br> _Adverse Event Reporter Qualification_ (`event_reporter_qualification__v`) | Object (_Event Reporter Qualification_) | C.2.r.4 |
| _Organisation_ (`organisation__v`) <br> Refers to _Adverse Event Organization_ (`adverse_event_organization__v`) |    Object | C.3.2 |
| _Patient (Name or Initials)_ (`patient_name_or_initials__v`) | Text (60) | D.1  |
| _Date of Birth_ (`date_of_birth__v`) |    Date | D.2.1 |
| _Age at Onset_ (`age_at_onset__v`) | Number (5) |    D.2.2a |
| _Body Weight (kg)_ (`body_weight_kg__v`) |    Number (6) (6dp) | D.3 |
| _Height (cm)_ (`height__v`) | Number (3) (0dp) | D.4 |
| _Gender_ (`gender__v`) | Object (_Event Gender_) | D.5 |
| _Reaction / Event Reported_ (`reaction_event_reported__v`) | Text (250) | E.i.1.1a |
| _Reaction / Event Language_ (`reaction_event_language__v`) | Object (_Language_) | E.i.1.1b |
| _Seriousness_ (`seriousness__v`) with values: <br> \- _Results in Death_ (`results_in_death__v`) <br> \- _Life Threatening_ (`life_threatening__v`) <br> \- _Caused / Prolonged Hospitalisation_ (`caused_prolonged_hospitalisation__v`) <br> \- _Disabling / Incapacitating_ (`disabling_incapacitating__v`) <br> \- _Congenital Anomaly / Birth Defect_ (`congenital_anomaly_birth_defect__v`) <br> \- _Other Medically Important Condition_ (`other_medically_important_condition__v`) | Picklist | E.i.3.2 |
| _Date of Start of Reaction / Event_ (`date_of_start_of_reaction_event__v`) | Date | E.i.4 |
| _Outcome of Reaction / Event_ (`outcome_of_reaction_event__v`) | Object (_Event Outcome_) | E.i.7 |
| _Event Country_ (`event_country__v`) | Object (_Country_) | E.i.9 |
| _Product_ (`product__v`)\* | Object (_Product_) | G.k.2.2 |
| _Product (Not Listed)_ (`product_not_listed__v`)\* | Text (250) | G.k.2.2 |
| _Reported Product_ (`reported_product__v`)\*\* | Text (1,500) | G.k.2.2 |
| _Batch Number(s)_ (`batch_number__v`)\*\* | Text (35) | G.k.4.r.7 |
| _Dosage Text_ (`dosage_text__v`)\*\* | Text (1,499) | G.k.4.r.8 |
| _Case Narrative_ (`case_narrative__v`) | Long Text (32,000) | H.1 |
| _Reporter's Comments_ (`reporter_comments__v`) | Long Text (20,000) | H.2 |

\* If you are using a single _Product_ model (for example, the _Product_ fields on the _Event_ object), populate only one of _Product_ or _Product (Not Listed)_.

\*\* If you are using a multiple _Product_ model (for example, the _Event Product_ child object), populate _Reported Product_, _Batch Number(s)_, and _Dosage Text_.

If _Reporter Same as Case Contact?_ is _True_, Vault pulls the _Reporter_ value from the associated _Case Contact_ rather than from the _Adverse Event_ record.

There are two data models for _Event_ information. The _Reaction / Event_ (e.g. headache, fever, etc.) can be modelled singularly with fields on the _Adverse Event_, or with multiply under one _Adverse Event_ with the _Event Reaction_ child object (`event_reaction__v`).

### Generating E2B(R3) Files with Attachments

You can generate E2B(R3) files with attachments by attaching files to the specific _Adverse Event_ record. This allows you to encode ICSR files with supporting documents and share them with an external system. 
Vault generates attachments with E2B(R3) files for the following file types:

* Portable Document Format (.pdf)
* Image File Formats (.jpeg, .jpg)
* Bitmap Image Format (.bmp)
* Portable Network Graphics (.png)
* Tagged Image File Format (.tif, .tiff)
* Rich Text Format (.rtf)
* Text Format (.txt)
* Spreadsheet File Format (.xls, .xlsx)
* Word Processing Document Format (.doc, .docx, .wpd)

#### Limitations

Vault does not limit the number of attachments on an _Adverse Event_ record. However, the total file size of the E2B(R3) report cannot be larger than 20 MB, and an individual attachment cannot exceed 15 MB.

You cannot add attachments to _Adverse Event_ records in the _Completed_ or _E2B Report Generated_ states.

## Using the Medical-Quality Vault Connection

When <a href="/en/gr/52757/#medquality">configured by an Admin</a>, you can click **Transfer to Quality** to transfer _Product Quality Complaint_ records to your QMS Quality Vault. Your Admin may configure this action as an entry action.

When additional information or a follow-up is received in MedInquiry that relates to a _Product Quality Complaint_ previously transferred to Quality, you can either:

  * Reopen the _Case_ and create a new _Product Quality Complaint_ record by copying the existing one, or
  * Create a new _Case_ and a new _Product Quality Complaint_ record

Once you create the new _Product Quality Complaint_ record, you can again perform the **Transfer to Quality** action.

## Using the Medical-Safety Vault Connection

When <a href="/en/gr/52757/#safmed">configured by an Admin</a>, you can click **Transfer to Safety** to transfer _Adverse Event_ records to your Safety Vault. Your Admin may configure this action as an entry action.

You can also click **Create Event Follow Up** to create a new _Event_ record that is linked to the previous _Case_ and _Adverse Event_. Any _Adverse Events_ created using the _Copy Record_ action on an _Adverse Event_ where the _Follow Up_ field is set to _Yes_ are created under the same _Case_ and linked to the source _Adverse Event_.

## Dedicated _Medical Inquiry_ User Interface {#dedicated-interface}

You can update your MedInquiry Vault to use the new dedicated _Medical Inquiry_ user interface. With the dedicated _Medical Inquiry_ interface, you can create all of the following on one screen:

  * A _Case_ record
  * Multiple _Adverse Events_
  * A _Case Contact_
  * Multiple _Case Requests_
  * Multiple _Case Responses_

You can also add notes to cases using the _Notepad_ on the _Medical Inquiry_ page. The _Notepad_ refers to a Text, Rich Text or Long Text field on the _Case_ object.

You can click **Save** at any point on the _Medical Inquiry_ page. You are not required to add _Case Requests_, _Adverse Events_, or _Case Responses_ at one time. Saving the case opens the _Case Detail_ page for the new Case.

### Creating a Case

To create a new case using the dedicated _Medical Inquiry_ user interface.  If the user interface is configured and enabled in your Vault:

  1. From the _Medical Inquiry_ tab, select **Cases**.
  2. Click **Create**.
  3. Enter the **Case Contact**. This is the doctor, pharmacist or other medical professional requesting the information. If the person requesting the information isn't listed as a case contact, you'll need to create a new case contact.

### Adding a Case Contact

You can create a new _Case Contact_ record from the _Medical Inquiry_ page by selecting **Create Person** and then selecting the **Case Contact** subtype. Enter the person's contact information, then click **Save**. You can continue to create a new case contact by navigating to **Medical Inquiry** > **Case Contacts** and clicking **Create**.

#### Case Contact Section

Depending on your Vault <a href="/en/gr/52757/#case-contact-section">configuration</a>, you may see a dedicated **Case Contact** section on the _Medical Inquiry_ page, under the _Notepad_. You can click **Case Contact** to add and edit contact details during the Medical Inquiry creation process, allowing for an instant return in the event that an HCP asks for information after you navigate away from the contact.

To use the section, you can select an existing _Case Contact_ from the drop-down by typing in the field or clicking the binoculars to search. You can also click **Create** on the left to add a new contact. Enter the person's contact information, then click **Save**.

Click the **Actions** menu next to _Contact_ and select **Edit Contact** to edit the contact information or **Change Case Contact** to select a different contact.

### Adding Case Requests

To add _Case Requests_ to a case:

  1. On the _Medical Inquiry_ page, click **Case Requests**.
  2. Enter information on the particular _Case Request_.

You can add multiple _Case Requests_. For example, you might need to capture questions the HCP has about several products.

#### Adding Adverse Events

While adding a _Case_, you can also add _Adverse Events_. To add an _Adverse Event_, in the _Case Requests & Adverse Events_ panel, click the arrow next **Add Case Request** and select **Add Adverse Event**. Then, enter the information on the _Adverse Event_.

### Creating a Case Response

To respond to a case, click the **Action** menu on the _Case Request_ you want to respond to, and select a response method. Then, fill out the relevant fields for the _Case Response_.

## Related Permissions

To perform the actions in this article, users must have a security profile that grants _Admin: Objects: Create_ and _Edit_ permissions on the following objects:

  * _Case_
  * _Case Request_
  * _Case Response_
  * _Case SLA_
  * _Fulfillment Document_
  * _Case Contact_
  * _Event_
  * _Person Address_
  * _Event Product_
  * _Event Reaction_

Users must also have the _Admin: Objects: Read_ and _Delete_ permissions on the _Adverse Event_ object type of the _Event_ object, and the _Admin: Objects: Read_ permission on the _Event Gender_, _Event Outcome_, _Event Report Type,_ and _Event Reporter Qualification_ objects. Users must have the _Delete Case Response Emails_ <a href="/en/gr/43127/#action_level_security">object action permission</a> to delete _Case Response Email_ object records. Users must have the _Admin: Objects: Read_ permission on the _Frequently Asked Question_ and _Standard Response_ objects and related objects. Users must also have _Admin: Objects: Read_ permission on the _Country_ and _Language_ fields on the _Case_ object, the _Frequently Asked Questions_, _Product_, and _Local Product_ fields on the _Case Request_ object, and the _Standard Response_ field on the _Case Response_ object.

[1]: #network-case-contacts
[2]: #cover-letter
[3]: #standard-response
[4]: #fdocs