# Configuring Medical Inquiry

The MedInquiry application in Vault Medical provides a compelling, complete solution for case management with no third party integrations needed. MedInquiry has three core capabilities:

  * Capturing requests for medical information (via UI and/or Vault API)
  * Assembling documents into a response package
  * Fulfilling inquiries directly from MedInquiry

You can manage cases and case contacts, define priority-based service level agreements (SLAs), automatically generate standard response cover letters, assemble electronic response packages, and directly fulfill inquiries via email.


<div class="note-border alert-info">
  <div class="alert alert-info" role="alert">
    <div><i class="far fa-info-circle"></i></div>
    <div class="alert-text">
      <p><strong>Note</strong>: If your organization is interested in enabling Medical Inquiry, we strongly recommend that configuration options be enabled by Veeva Services. For assistance with the design and configuration of the legacy and new <a href="/en/gr/52757/#configuring-dedicated-interface">Medical Inquiry interfaces</a>, contact Veeva Services.</p>
    </div>
  </div>
</div>


## Medical Inquiry Objects {#medical-inquiry-objects}

Medical Inquiry contains the following objects to manage data:

  * The _Case_ object holds all of the information about an individual request for information and is the parent object to the _Case Requests_ and _Case Content User Tasks_ objects.
  * The _Case Contact_ is a <a href="/en/gr/32857/">subtype</a> of the _Person_ object used to hold information about the person making the inquiry. Using the _Case Contact_ subtype requires that _Object Types_ be enabled on the _Person_ object.
  * The _Case Request_ object holds the individual pieces of information.
  * The _Case Response_ object holds all attributes of the response to the inquiry and is the parent object to the _Fulfillment Docs_  and _Case Response Email_ objects.
  * The _Case Intake_ object contains fields that correspond to fields on the _Case, Case Request_, and _Case Response_ objects. If enabled, this allows users who intake inquiries to input information for all three objects from a single <a href="/en/gr/52757/#case-intake-form">_Case Intake_</a> form.
  * The _Fulfillment Documents_ object holds the documents used to respond to an inquiry and, if responding by email, allows you to control the order of documents in the response package. You cannot create custom object types for the _Fulfillment Documents_ object.
  * The _Case Response Email_ object stores the content of the response email.
  * The _Case SLA_ determines the deadline for responding to a request.
  * The _Person Address_ object holds contact information for a _Case Contact_.
  * The _Adverse Event_ subtype of the _Event_ object holds information about adverse events.
  * The _Event Product_ object holds information about multiple products related to adverse events.
  * The _Event Reaction_ object holds information about multiple reactions related to adverse events.
  * The _Case Response Email Template_ object stores templates that can be used when sending email Case Responses.
  * The _Frequently Asked Questions_ object stores FAQs.
  * The _Standard Response_ object stores approved answers to FAQs.
  * The _Medical Inquiry Keyword_ object stores inquiry keywords and variations.
  * The _Response Document Access_ object stores the number of views and downloads of cover letters and fulfillment documents made via the _Response Document_ link for a _Case Response_.

## Configuring Medical Inquiry Objects

MedInquiry allows you to edit and add to your <a href="/en/gr/15298/">application data model</a> by <a href="/en/gr/15057/">customizing standard objects,</a> creating custom objects, and <a href="/en/gr/28740/">configuring object relationships</a>. You can also configure business rules using lifecycle and workflow options.

Users must have _Create_ and _Edit_ <a href="/en/gr/22824/">permissions</a> on the object they want to edit in addition to Admin: Configuration: Objects: _Create_ and _Edit_ permissions to create and <a href="/en/gr/15057/">configure</a> objects.

### Configuring the Medical Inquiry User Role Setup Object

To streamline the setup process for global teams, Vault includes the _User Role Setup (Case)_ object, several standard DateTime fields with corresponding Date fields on the _Case_ object, and a _Country_ lookup field on the _Case Request_ and _Event_ objects. This simplifies global configurations by allowing users to manage access and visibility to _Case_ records and _Case_-related records through a custom _User Role Setup_ object, by adding DateTime fields to the _Case_ object to support users located in different time zones, and by displaying the _Country_ value from parent _Case_ records. 

This feature allows Admins to refine the security for _Cases_ more than the standard _User Role Setup_ object allows. Additionally, this feature allows Admins to set up record sharing and access permissions based on geography consistently across the entire lifecycle of a _Case_; eliminates the risk of data entry errors on _Case_-related records; and reduces the configuration required for global implementations by ensuring that teams have access to _Case Requests_ and _Events_ related to their location.

To activate the DateTime fields:

1. Navigate to **Admin > Configuration > Objects > Case**. 
2. Click the **Fields** tab, and select a DateTime field:
   1. **Opened Date**: The date that the _Case_ was opened.
   2. **Closed Date**: The date that the _Case_ was closed.
   3. **First Response Sent Date**: The date when an initial response was sent to the case contact.
   4. **Target Close Date**: The date on which the _Case_ is expected to close.
3. Click **Edit** and change the field's status from **Inactive** to **Active**.
4. Click **Save**.

Users require the _Create_, _Read_, _Edit_, and _Delete_ permissions on the _User Role Setup (Case)_ object.

## Configuring Adverse Events

When creating a case, you can also capture core details of associated *Adverse Event*s. To enable this functionality, add a related object section for the _Event_ object to the _Case_ <a href="/en/gr/26387/#how-to-access-page-layouts">page layout</a>. We recommend entering **Adverse Events** as the _Section Label_ and filtering the related list by **Event Type equals Adverse Event**. You can also create events in _Business Admin_.

You must configure the _Adverse Events_ section if you intend to use the <a href="/en/gr/662819/">Medical-Safety Vault Connection</a> for _Case_ processing and reporting. See [Configuring the Medical-Safety Vault Connection][2] for more information.

Users require the _Create_, _Read_, _Edit_, and _Delete_ permissions on the _Adverse Event_ object type, and the _Read_ permission on _Event Gender_, _Event Outcome_, _Event Report Type,_ and _Event Reporter Qualification_ objects.

### Configuring Event Products & Event Reactions {#event-products-reactions}

HCPs often report _Adverse Events_ with multiple reactions and products. Using the _Event Product_ and _Event Reaction_ objects, Medical Inquiry users can capture this information and include it when generating E2B(R3) Individual Case Safety Report files. 

These objects are inactive by default. To enable the _Event Product_ and _Event Reaction_ objects, navigate to **Admin > Configuration > Objects > [Object]** and click **Edit**, then select **Active** in the _Status_ drop-down and click **Save**.

Once activated, you can add a related object section for the **Event Product** and **Event Reaction** objects to the _Case_ page layout. 

## Enabling Product Quality Complaints

While requesting medical information, an HCP may communicate a product quality complaint to the Medical Inquiry user. Users can capture this information using the _Product Quality Complaint_ subtype of the _Event_ object.

By default, this <a href="/en/gr/32857/">object type</a> is inactive in Vaults created before 23R3. To activate the _Product Quality Complaint_ object type:

  1. Navigate to **Admin > Configuration > Objects > Event**.
  2. Click the **Object Types** tab.
  3. Click **Product Quality Complaint**.
  4. Click **Edit**.
  5. Change the _Status_ to **Active**.
  6. Click **Save**.

After activating the object type, you can add a <a href="/en/gr/26387/">page layout</a> to surface _Product Quality Complaints_ to users. 

Users require the _Create_, _Read_, _Edit_, and _Delete_ permissions on the _Product Quality Event_ object type, and the _Read_ permission on _Event Gender_, _Event Outcome_, _Event Report Type,_ and _Event Reporter Qualification_ objects.

## Generating Individual Case Safety Report Files

To generate E2B(R3) Individual Case Safety Report files, users must have the following <a href="/en/gr/23647/#how_to_edit_permission_sets">permissions:</a>

* _Document: Bulk Update_
* _Operations: Jobs: Read_
* _Create Document_ on the _Individual Case Safety Report (ICSR)_ <a href="/en/gr/2572/#view">document type</a>

You'll also need to add the **Edit Document** and **Edit Relationships** permissions for the Owner and Editor roles on the _Generated_ and _Requires Regeneration_ states of the _Event Generated Document_ lifecycle.

<div class="note-border alert-info">
  <div class="alert alert-info" role="alert">
    <div><i class="far fa-info-circle"></i></div>
    <div class="alert-text">
      <p><strong>Note</strong>: The exported E2B(R3) report includes the country according to the ISO 3166-1 standard. To include a country in the report, populate the <em>Country Code</em> field on the <em>Country</em> record with the 2-letter ISO 3166-1 country code.</p>
    </div>
  </div>
</div>


## Configuring Medical Inquiry Cover Letters

You can manage Medical Inquiry cover letter templates in **Business Admin > Templates > Documents & Binders**. For more information about document templates, see <a href="/en/gr/5509/">Managing Document Templates</a>.

There are two types of Medical Inquiry cover letter:

  * The _Medical Inquiry Cover Letter_ references the related _Case_ object record.
  * The _Medical Inquiry Case Response Cover Letter_ references the _Case_, _Case Request_ and _Case Response_ object records.

Download a <a class="download-link " href="https://platform.veevavault.help/assets/downloads/sampleMedicalInquiryCoverLetter.docx" target="_blank" rel="noopener">sample Medical Inquiry cover letter<i class="fa fa-download" aria-hidden="true"></i></a>.

Download a <a class="download-link " href="https://platform.veevavault.help/assets/downloads/sampleMedicalInquiryCaseResponseCoverLetter.docx" target="_blank" rel="noopener">sample Medical Inquiry Case Response Cover Letter<i class="fa fa-download" aria-hidden="true"></i></a>.

By default, Vault uses the _Medical Inquiry Cover Letter_ document type. To configure the user action in the _Case Response_ object lifecycle to use the _Medical Inquiry Case Response Cover Letter_ document type:

  1. Navigate to **Admin** > **Configuration** > **Object Lifecycles**.
  2. Select the **Case Response** lifecycle.
  3. Select the **Draft** state.
  4. Click **Edit** in the **User Actions** panel.
  5. Select the **Medical Inquiry Case Response Cover Letter** document type.
  6. Select a cover letter template.
  7. Click **Save**.

The _Medical Inquiry Case Response Cover Letter_ document type includes the _Country_ field, which Vault automatically populates based on the <a href="/en/gr/52722/#creating-a-new-case">_Country_ on the _Case Response_</a>. You can <a href="/en/gr/18769/">configure the list of available countries</a> by navigating to **Business Admin > Objects > Countries**.

## Enabling FAQs & Standard Responses {#configuring-faqsr}

Vault Medical allows users to quickly and seamlessly answer _Frequently Asked Questions_ (_FAQs_) using _Standard Responses_ while working with Medical Inquiries. Medical Inquiry users can search for FAQs from the _Case Request_ and then select a corresponding standard response that answers the question on the subsequently created _Case Response_. This functionality helps standardize responses to common questions and lessens the amount of time required to create a response package. 

FAQs in Vault are records containing medical inquiries commonly asked by HCPs and patients. Each can have one or more approved _Standard Response_ records. After a user selects a response, Vault populates the Case Response with the response notes, a package of fulfillment documents, and can draft an email which users can choose to edit or send.

FAQs typically consist of the _Question_ that is frequently asked. A Business Admin can select a _Language_ and choose one or more _Product Families_ (previously _Products_) and _Countries_ that relate to the FAQ. You can also define _Related FAQs_. You can, for instance, define language and country variations.

_Standard Responses_ typically consist of _Standard Response Notes_ that answer the question, _Guidelines for Use_, an _Email Template_, and a _Language_. You can define which _Product Families_ and _Countries_ the FAQ is relevant to and choose the FAQ(s) to which this response is an answer. You can also link a _Standard Response_ to the _Case Response Email Template_ to indicate the email template Vault should use when generating a response package. 

### Configuring Layouts

Before you can create _FAQs_ and _Standard Responses_, you must first configure the **Case Request** <a href="/en/gr/26387/">object layout</a>:

  1. Navigate to **Admin > Configuration > Objects > Case Request > Layouts**.
  2. Open the layout.
  3. Add the **Frequently Asked Question** field to the layout.
  4. Click **Done**, and then click **Save**.

You can also allow users to see _FAQ_ field values while working on the _Case Request_ record by navigating to **Admin > Configuration > Objects > Case Request > Fields > FAQ Question** and adding a <a href="/en/gr/34072/">lookup field</a> where the _Lookup Relationship_ is **Frequently Asked Question** (`frequently_asked_question_vr`) and the _Lookup Source Field_ is the **Question** (`question__v`) field on that object.

Next, you must configure the **Case Response** object layout:

  1. Navigate to **Admin > Configuration > Objects > Case Response > Layouts**.
  2. Open the layout.
  3. Add the **Standard Response** field to the layout.
  4. Click **Done**, and then click **Save**.

You can also allow users to see _Standard Response_ field values while working on the _Case Response_ record by navigating to **Admin > Configuration > Objects > Case Response > Fields > Standard Response Notes** and adding a <a href="/en/gr/34072/">lookup field</a> where the _Lookup Relationship_ is **Standard Response** (`standard_response_vr`) and the _Lookup Source Field_ is the **Standard Response Notes** (`standard_response_notes__v`) field on that object. Then, on the **Guidelines for Use** field, add a lookup field where the _Lookup Relationship_ is **Standard Response** (`standard_response_vr`) and the _Lookup Source Field_ is the **Guidelines for Use** (`guidelines_for_use__v`) field.

### Adding FAQ & Standard Response Tabs

To allow Business Admins to create and access FAQs and responses, you can add a <a href="/en/gr/23516/">custom tab</a>:

  1. Navigate to **Admin > Configuration > Tabs**.
  2. Click **Create**.
  3. Enter **Frequently Asked Questions** as the **Label**.
  4. Click the **Tab Type** drop-down and select **Object**.
  5. Click the **Object** drop-down and select **Frequently Asked Questions**.
  6. Under _Creation Options_, select **Create record in pop-up dialog**.
  7. Click **Save**.
  8. Repeat steps 2 through 8 to create a **Standard Response** tab.

### Configuring FAQ Quick Search {#faq-quick-search}

If users are not required to capture exactly what an HCP has asked in a medical inquiry, they can use the _FAQ Quick Search_ section on the _Case_ to search for and select _FAQs_ and provide the HCP a related _Standard Response_.

To use this feature, add the _FAQ Quick Search_ section to the _Case_ object page layout  under **Admin > Configuration > Objects > Case > Page Layouts > Case Detail Page Layout**. Also ensure that the _Local Product_ and _Product Family_ filters are active on the _Case Request_ object under **Admin > Configuration > Objects > Case Request** and show the active _Local Products_ with a join record to the selected _Country_ and the active _Product Families_ with a join record to the selected _Local Product_.

Additionally on the _Case Request_ object, ensure that the _Frequently Asked Questions_, _Product_, _Product Family_, _Local Product_, _Country_, and _Language_ fields are active and that the standard relationship between _Local Product_ and _Product Family_ is configured. Also ensure that the standard filter for the _Frequently Asked Question_ field is active and includes values for _Country_, _Language_, and _Product_. Custom filters for this field are not allowed. 

On the _Response_ object under **Admin > Configuration > Objects > Response**, ensure that the _Case_ and _Case Request_ fields are active and that the default _Standard Response_ can be entered in the _Standard Response_ field.

### Configuring Medical Inquiry UI

Next, you must edit the _Medical Inquiry_ layout to enable Medical Inquiry users to select an _FAQ_ and a corresponding _Standard Response_ during the intake process:

  1. Navigate to **Admin > Configuration > Pages > Medical Inquiry** and click the **Medical Inquiry** layout.
  2. Click **Case Children**.
  3. Click **Edit**.
  4. Click the **Actions** menu on the _Case Request_ section and select **Edit**.
  5. Add the **Frequently Asked Question** object. You can also add the **FAQ Question** field if you previously configured it as a lookup field.
  6. Optional: If you added Criteria VQL to the _FAQ_ section on the _Case Request_ page layout, select the **Require save prior to adding this record** checkbox and verify that any fields referenced in the Criteria VQL are on the layout.
  7. Optional: Select the **Auto-Suggest FAQs** checkbox (_Case Request_ object only). This allows Vault to automatically suggest _FAQ_ records. By default, Vault matches based on the _Request Details_ field. You can select another field using the **Request Details Field (for FAQ matching)** drop-down.  
  8. On each _Case Response_ where you wish to show available _Standard Responses_ (such as _Email_ or _Phone_), repeat steps 2 - 5 to add the **Standard Response** object and any previously configured lookup fields. 
  9. Optional: If you added Criteria VQL to the _Standard Responses_ section on the _Case Response_ page layout, select the **Require save prior to adding this record** checkbox and verify that any fields referenced in the Criteria VQL are on the layout.
  10. Click **Save**, then click **Save** again.

<div class="note-border alert-info">
  <div class="alert alert-info" role="alert">
    <div><i class="far fa-info-circle"></i></div>
    <div class="alert-text">
      <p><strong>Note</strong>: Vault only automatically populates <em>Frequently Asked Questions</em> if the <em>Medical Inquiry User Interface</em> includes the <em>Frequently Asked Question</em> (<code class="language-plaintext highlighter-rouge">frequently_asked_question__v</code>) field.</p>
    </div>
  </div>
</div>


###  Suggested Responses {#auto-sr}

When configured, Vault can attempt to automatically match the inquiry to an appropriate _FAQ_. To find an appropriate _FAQ_ record, Vault compares the inquiry to the _Question_ field on _FAQs_ and filters possible matches by the _Country_, _Language_, and _Product Family_ fields on the _Case Request_. Contact Veeva Support to adjust the required similarity of _FAQ_ text.

After matching the inquiry to an _FAQ_, Vault suggests a corresponding _Standard Response_. If previously defined, Vault suggests the default _Standard Response_ to the _FAQ_. If not, Vault suggests the first listed _Standard Response_.

Vault suggests responses regardless of intake channel. For instance, you can:

  * Enable automatic matching in the Medical Inquiry UI for inquiries captured over the phone.
  * Configure Vault to automatically exclude inquiries from other channels, such as email, Veeva CRM, or webforms by configuring entry actions that execute when users create a _Case Request_.

You can add the following <a href="/en/gr/59885/#entry-actions">entry</a> or <a href="/en/gr/59885/#user-actions">user actions</a> to _Case Request_ lifecycle states:

  * **Suggest FAQ**: This action matches the inquiry to an _FAQ_. You can also select the _Matching Field_. For email inquiries. this should be the _Body Text_ field.  For other intake channels, it is typically the _Request Details_.
  * **Create Related Standard Response**: This action creates a related _Case Response_ record with the default _Standard Response_ for the identified _FAQ_. If there is no set default response, Vault selects the first _Standard Response_.

### Configuring Object & Document Lifecycles

After configuring Medical Inquiry page layouts, you must update the **Case Response** and **Standard Response** <a href="/en/gr/30683/">object lifecycles</a>:

  1. Navigate to **Admin > Configuration > Object Lifecycles > Case Response**. 
  2. Click the relevant state.
  3. Add the **Update field** action as either an <a href="/en/gr/59885/#entry-actions">entry action</a> or <a href="/en/gr/59885/#user-actions">user action</a> to set a default field value. 
  4. Select the **Response Notes** field and enter `standard_response__vr.standard_response_notes__v`.
  5. Add the **Update field** action as either an <a href="/en/gr/59885/#entry-actions">entry action</a> or <a href="/en/gr/59885/#user-actions">user action</a> to set a default field value. 
  6. Select the **Email Template** field and enter `standard_response__vr.email_template__v`.
  7. Optional: Add the **Update field** action as outlined above as an entry or user action for other fields as desired. Vault does not support long text or rich text fields in default values.
  8. Add the **Add Standard Fulfillment Documents** entry action. This action creates _Fulfillment Document_ records on the _Case Response_ based on any present _Standard Response Document_ records on the _Standard Response_.
  9. Navigate to **Object Lifecycles > Standard Response** and click the **Approved** state.
  10. Add the **Require Documents are in Steady State** entry action to ensure all _Standard Response Fulfillment Documents_ are in the steady state. 

### Keeping the Standard Response Fulfillment Documents Up to Date

You can add two document actions as entry actions on document lifecycle states. These actions trigger updates to any _Standard Response Fulfillment Document_ records that reference that document.

  * **Set Std Resp Doc to Latest Steady State**: Automatically updates the document version on the _Standard Response Fulfillment Document_ record to the latest steady state version. The _Standard Response_ will then automatically reference any newly approved version of the document. 
  * **Require Review of Standard Responses**: Moves all _Standard Response_ records with a _Standard Response Fulfillment Document_ that references the current document into the _Requires Review_ state. You can use this action to trigger a review of the _Standard Response_ that uses this document. This is relevant if your organization wants to review the _Standard Response_ when the response package changes and when a document moves into the _Obsolete_ state.

## Creating FAQs & Standard Responses {#add-faqsr}

Once configured, Business Admins can begin creating and maintaining _FAQs_ and _Standard Responses_.

### Adding FAQs

To add a _Frequently Asked Question_, click on the _Frequently Asked Question_ custom tab if configured, or navigate to **Business Admin > Objects > Frequently Asked Question** or use the _Component_ selector. Click **Create**, enter a **Name** and **Question**, and select a **Language**. You can optionally select a **Primary Frequently Asked Question** and a **Default Standard Response**.

After creating a _FAQ_, you can add **Frequently Asked Question Variations** for other languages. On this _Variation_ record, select the original _FAQ_ as the **Primary Frequently Asked Question**.

Under _Standard Responses_, click **Add** to add any _Standard Responses_ to which this _FAQ_ is a question. You can add one or more _Responses_. Then, add the relevant **Product Families** and **Countries** under _Product Families_ and _Countries_ respectively.

Once you finish editing the _FAQ_, click the lifecycle chevron or click the **Actions** menu and move the _FAQ_ record to the **Approved** state to make it available to Medical Inquiry users.

### Adding Standard Responses

To add a _Standard Response_, click on the _Standard Responses_ custom tab if configured, or navigate to **Business Admin > Objects > Standard Response** or use the _Component_ selector. Click **Create**, enter a **Name** and **Standard Response Notes**, and select a **Language**. You can optionally add **Guidelines for Use** or select an **Email Template** and **Primary Standard Response**.

After creating a _Standard Response_, you can add **Standard Response Variations** for other languages. On this _Variation_ record, select the original _Standard Response_ as the **Primary Standard Response**. 

Under _Frequently Asked Questions_, click **Add** to add any _FAQs_ to which this response is an answer. You can add one or more _FAQs_ as this answer may apply to several questions. Then, add the relevant **Product Families** and **Countries** under _Product Families_ and _Countries_ respectively.

Once you finish editing the _Standard Response_, click the lifecycle chevron or click the **Actions** menu and move the _Standard Response_ record to the **Approved** state to make it available to Medical Inquiry users.

## Configuring Medical Inquiry Keywords {#keywords}

You can identify and track _Keywords_ that frequently appear in _Case Requests_. _Keywords_ help Medical Inquiry users obtain crucial insights into the requests for medical information they receive, driving new content creation.

To enable _Keywords_:

  1. Navigate to **Admin > Configuration** and, under the _Medical Inquiry Configurations_ section, click **Medical Inquiry Job Controls**.
  2. Click **medinquiry\_keywords\_\_v**.
  3. Click the **Actions** menu and select **Edit**.
  4. In the _Status_ drop-down, select **Active**.
  5. Click **Save**.

Once enabled, you can perform the following actions from the **Medical Inquiry Job Control: Medical Inquiry Keyword Matching** page:

  * **Run Historical Keyword Matching** schedules an asynchronous job to identify _Keywords_ mentioned in existing _Case Requests_. If Vault identifies a _Keyword_ in the existing _Request Details_ field of the _Case Request_, it creates a _Case Request Medical Inquiry Keyword_ join object record between the objects. Vault matches on all _Case Requests_ where the _Created Date_ is less than three years before the job's _Scheduled Start Time_. Vault will run a job for each month over the past three years.
  * **Reload Medical Inquiry Keywords** refreshes _Keyword_ records.

When users update a _Case Request_, Vault automatically schedules a _Keyword_ matching job that will run five minutes after users save the _Case Request_ record. This job matches on all _Case Requests_ where the _Last Modified Date_ is greater than or equal to either the _Last Successful Run Date_ or one week ago, whichever is greater.

To display identified _Keywords_ in the _Medical Inquiry Keywords_ section on _Case Request_ records, add a **Related Object** section to the _Case Request_ object page layout.

### Defining Keywords

You can also manually create _Keywords_ and _Keyword Variations_ by navigating to **Business Admin > Objects > Medical Inquiry Keywords**. When creating a _Keyword Variation_, you must select the associated **Primary Keyword** for the variation. Keyword Variations allow different variations of a keyword to be grouped together.

You can define a maximum of 500 _Medical Inquiry Keywords_ per Vault. The combined number of active _Medical Inquiry Keyword_ and _Medical Inquiry Keyword Variation_ records cannot exceed 2,000 per Vault.

### Keyword Matching Logic

When matching _Case Requests_ and _Keywords_, Vault considers the _Request Details Long_ or _Request Details_ field on the _Case Request_ object and attempts to match on the _Name_ field of any active _Medical Inquiry Keyword_ object records.

If a match is made to a _Medical Inquiry Keyword_ record, Vault creates a _Case Request Medical Inquiry Keyword_ join object record between the _Case Request_ and the _Primary Medical Inquiry Keyword_. If Vault finds a match with a _Keyword Variation_, it creates a _Case Request Medical Inquiry Keyword_ join object record between the _Primary Keyword_ and the _Case Request_. _Keyword Variations_ can then link to the _Primary Keyword_, creating data that is more suitable for reporting and analysis.

Each _Case Request_ can have a maximum of ten _Case Request Medical Inquiry Keyword_ join object records. If additional _Keywords_ match, they are not recorded. The most commonly occurring _Keywords_ are logged.

Vault also deletes any _Case Request Medical Inquiry Keyword_ join object records between the _Case Request_ from which the job is run and the _Medical Inquiry Keyword_ if:

  * The _Medical Inquiry Keyword_ record no longer exists.
  * The _Medical Inquiry Keyword_ record is inactive.
  * The _Medical Inquiry Keyword_ or a corresponding _Medical Inquiry Keyword Variation_ is no longer included in the _Request Details Long_ or _Request Details_ field.

### Medical Inquiry Keyword Cleanup & Reprocessing

Vault also includes the following jobs to maintain keywords:

  * **Medical Inquiry Keyword Cleanup**: This job deletes _Case Request Medical Inquiry Keyword_ join object records related to _Case Request_ records created more than three years ago. 
  * **Medical Inquiry Keywords Matching (Reprocess)**: This job reprocesses _Keywords_ identified on _Case Requests_ to update the join object records between the two whenever a user edits a _Primary Keyword_ or edits or deletes a _Keyword Variation_. If a user deletes a _Keyword Variation_, Vault will delete the join object record. If a user edits a _Keyword Variation_ and it is no longer included on the _Case Request_, Vault will delete the join object record.

## Medical Inquiry Lifecycles

Medical Inquiry has four object <a href="/en/gr/29798/">lifecycles</a>:

  * The _Case Content User Task_ lifecycle is used by the _Case Content User Task_ object to mark a task as _Open_ (initial state) or _Complete_.
  * The _Case Request Lifecycle_ creates and tracks new case request records. Newly created case requests begin in the _New_ state.
  * The _Case Response_ lifecycle moves a response through the approval process  from an initial state of _New_.
  * The _Case_ lifecycle creates and tracks new case records from an initial state of _New_ to a complete state of _Completed_.

You can modify existing lifecycles, create custom lifecycles, and <a href="/en/gr/30683/">add custom lifecycle states</a> to create lifecycles that suit your organization's needs.

## Medical Inquiry Workflows

The _Case_ lifecycle uses the _Case Assignment_ workflow to assign an active case to a user for fulfillment. Users can respond to the request, resulting in a state change to _Response Sent_, which triggers a task to receive confirmation from the case contact to move the case to a final state of _Closed._ Alternately, users can select **Close Case** from the **Actions** menu, which will move the _Case_ to a closed state without confirmation.

The _Case Response_ lifecycle uses the _Approve Case Request_ workflow to assign a task to a medical inquiry approver to review and approve a response package before it's sent for fulfillment. The case begins in _In Approval_ state and changes to _Approved_ state upon approval. This will also trigger the _Cover Letter_ to move to a steady state and automatically generate a final response package based on the steady state documents. Alternately, the approver can reject the response package and the state will change to _Draft_. After a user sends a response to the requestor, the state changes to _Response Sent_. If Vault is unable to deliver the response package email and <a href="/en/gr/52757/#email-tracking">_Email Tracking_</a> is enabled, Vault changes the state to _Email Bounced_ and sends a notification with the reason for the failure to the user who sent the response package.

See more about <a href="/en/gr/33550/">modifying these existing workflows and creating custom workflows</a>.

## Configuring HCO & Address Data & Search UI {#enhanced-hco-search}

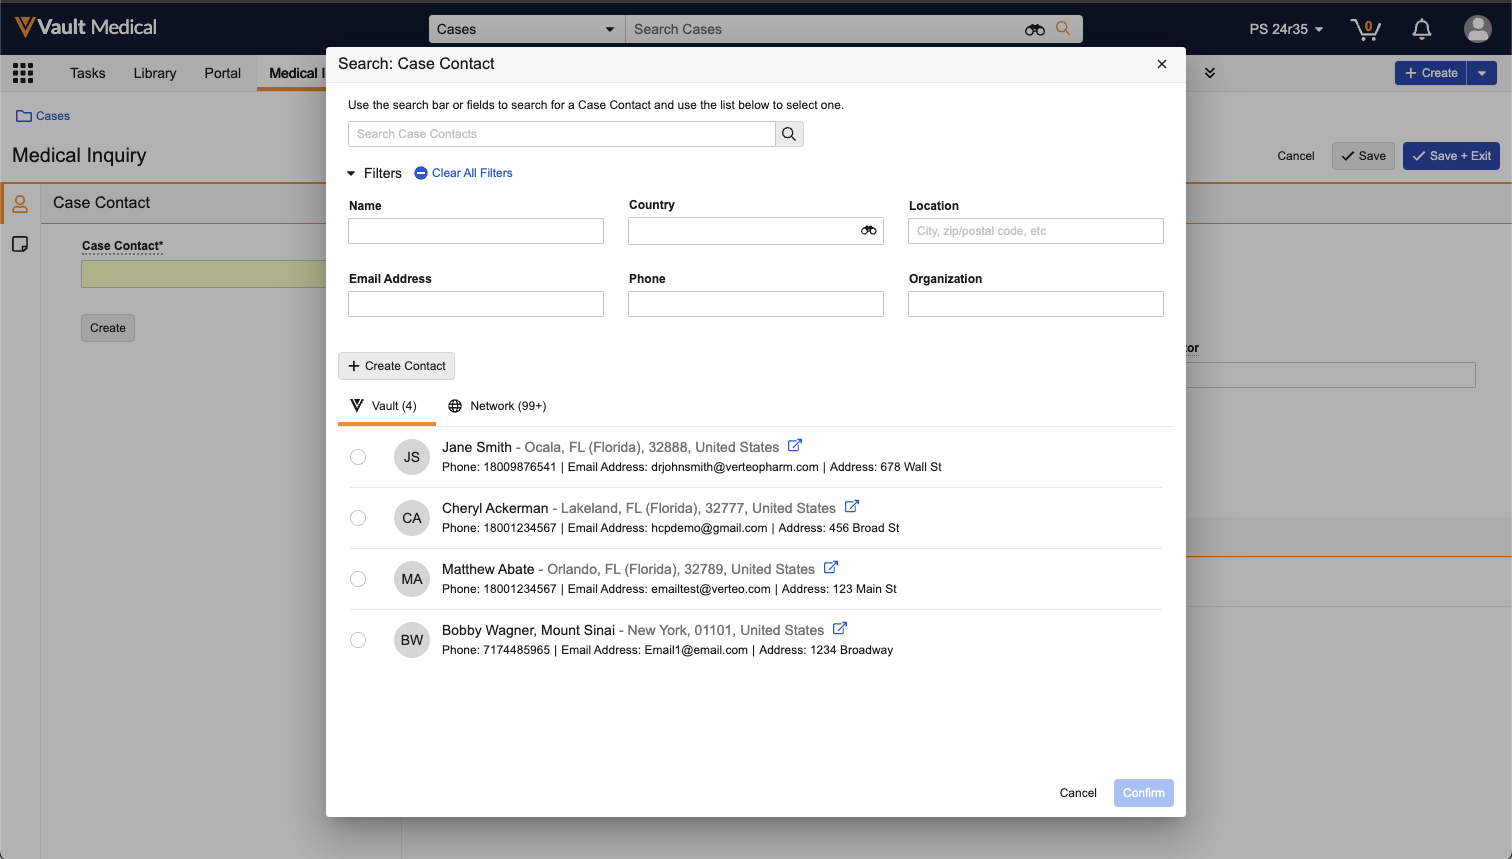
To enable an enhanced _Search: Case Contact_ dialog, contact Veeva Product Support.

<a href="https://platform.veevavault.help/assets/images/OpenData_CaseContact_Search_24r34.png" data-lightbox="images" data-title="" data-alt="Enhanced Search: Case Contact dialog">
  <img class="docimage" src="https://platform.veevavault.help/assets/images/OpenData_CaseContact_Search_24r34.png" alt="Enhanced Search: Case Contact dialog" style="max-width: 60%;"  />
</a>

##  Configuring Automatic Case Response Creation {#auto-case-response}

You can configure Vault to automatically create _Case Response_ records when users create a _Case_ or _Case Request_. To configure automatic _Case Response_ creation, add the **Create Related Object Record** <a href="/en/gr/59885/">user action or entry action</a> on the **Case**, **Case Request**, or **Event** object lifecycles.

###  Configuring Acknowledgement Emails {#acknowledgement-emails}

You can leverage automatic _Case Response_ creation to automatically send **Acknowledgement Emails** to inquiring HCPs. _Acknowledgement Emails_ confirm that your organization received the inquiry and includes case details, such as the case number and when they can expect a response.

To begin configuring _Acknowledgement Emails_, you must activate the object type:

  1. Navigate to **Admin > Configuration > Objects > Case Response**.
  2. Click the **Object Types** tab.
  3. Click **Acknowledgement Email**, then click **Edit**.
  4. Set the _Status_ to **Active**.
  5. Click **Save**.

On creation of the _Acknowledgement Email_ record, you must select a default _Email Template_ that contains the _Subject_ and _Body_ of the required acknowledgement email. You can also allow Vault to automatically compose an email from the template and send it to the HCP via a workflow, by configuring the **Send Response Package** action as an entry action.

## Enabling Ad Hoc Fulfillment Documents & Attachments {#ad-hoc-docs}

To allow Medical Inquiry users to add ad hoc fulfillment documents and attachments to a response package, navigate to the _Case Response_ object layout. In the _Fulfillment Documents_ section, select the **Allow Object Record Attachments to be added as Fulfillment Documents** checkbox. Then activate the _Medical Inquiry Ad Hoc Fulfillment Document_ document type.

## Configuring Medical Inquiry Emails

You can configure several Medical Inquiry Case Response Email settings in your Vault.

### Case Response Emails {#case-response-emails}

Vault determines which email address to send a Case Response email to using the following logic:

  * By default, Vault sends the Case Response email to the email address in the _Email_ (`email__sys`) field on the _Case Contact_ (`person_reference__v`) selected on the _Case Response_.
  * If you add an _Associated Contact_ to the _Case Response_'s _Response Contact_ (`response_contact__v`) field, and the _Email_ (`email__sys`) field on the _Response Contact_ is populated, then Vault sends the Case Response email to this email address. 
  * If you add a _Person Information_ record to the _Case Response_'s _Contact Information_ (`mailing_address__v`) field, and the _Email_ (`email__v`) field on the _Person Information_ record is populated, then Vault sends the Case Response email to this email address. 

To allow users to select an email address other than that of the _Case Contact_:

  1. Add the _Contact Information_ (`mailing_address__v`) field to the _Email_ type of the _Case Response_ object.
  2. Update the Criteria VQL on the _Email_ object type's _Email_ field to **`object_type__vr.name__v = 'Email'`**.
  3. Add the _Contact Information_ field to the page layout for the _Email_ object type.
  4. Update the _Case Response To_ formula to **`if(isBlank(test_address__vr.name__v),test_person__vr.name__v&" <"&test_person__vr.email__sys&">",test_person__vr.name__v&" <"&test_address__vr.email__v&">")`**.

You may add the _Response Contact_ field to the _Case_ and _Case Response_ objects, but we do not recommend adding both the _Response Contact_ and _Contact Information_ fields at the same time.

<div class="note-border alert-info">
  <div class="alert alert-info" role="alert">
    <div><i class="far fa-info-circle"></i></div>
    <div class="alert-text">
      <p><strong>Note</strong>: If the <em>Response Contact</em> field is present but empty, Vault defaults back to the email in the <em>Case Contact</em> field.</p>
    </div>
  </div>
</div>


To add the _Response Contact_ field:

  1. Navigate to **Admin > Configuration > Objects > Case**.
  2. Click **Page Layouts**.
  3. Click **Case Detail Page Layout**.
  4. Under _Details_, click **Add** and select **Response Contact**.
  5. Optional: Move the **Response Contact** field as necessary.
  6. Click **Save**.
  7. Repeat steps 1 through 6 to add the **Response Contact** field to the **Case Response** page layout.

### Case Response Email Templates {#case-response-email-templates}

While creating a case response, users can select a pre-configured case response email template.

<div class="note-border alert-info">
  <div class="alert alert-info" role="alert">
    <div><i class="far fa-info-circle"></i></div>
    <div class="alert-text">
      <p><strong>Note</strong>: To simplify the process for Medical Inquiry users, we recommend applying a default template to the Case Response based on business logic.</p>
    </div>
  </div>
</div>


To configure case response email templates:

1. Navigate to **Business Admin > Case Response Email Templates**.
2. Click **Create**.
3. Enter a **Name**. The name may include the language, country, and product.
4. Optional: Enter a **From** address.
5. Optional: Enter a **Reply To** address.
6. Enter a **Subject**. Subject text uses rich text formatting and must be wrapped in quotation marks.
7. Enter a **Body**. Body text uses rich text formatting and must be wrapped in quotation marks. 
8. Optional: Select a **Language**. This corresponds to the _Language_ on the Case Response.
9. Click **Save**, or click **Save + Create** to add another template.
10. Optional: Select one or more **Countries** or **Product Families**.

#### Adding a Reference Constraint

You can create a <a href="/en/gr/592/#Dynamic_Reference_Constraints">reference constraint</a> on the _Email Template_ field to restrict the list of templates available to Medical Inquiry users. For example, you can add the following constraint to restrain templates based on _Country_, _Language_, and _Product Family_:


`state__v = 'approved_state__v' AND id IN (SELECT case_response_email_template__v FROM case_response_email_template_product__vr WHERE product__v = {{this.product__v}}) AND id IN (SELECT case_response_email_template__v FROM case_response_email_template_country__vr WHERE country__v = {{this.country__v}}) AND language__v = {{this.language__v}}`


<div class="note-border alert-info">
  <div class="alert alert-info" role="alert">
    <div><i class="far fa-info-circle"></i></div>
    <div class="alert-text">
      <p><strong>Note</strong>: Before configuring a reference constraint, verify that the constraining objects, such as <em>Country</em> and <em>Language</em>, are available on the <em>Case Response</em> and <em>Case</em> <a href="/en/gr/26387/#how-to-access-page-layouts">page layouts</a>.</p>
    </div>
  </div>
</div>


#### Using Tokens in Email Templates

You can insert <a href="/en/gr/6382/">tokens</a> in email template subjects and body text using rich and long text formatting. 

An example body with tokens is:

~~~
"<p>Dear Dr. "&test_person__vr.last_name__sys&",</p>
<p><br></p>
<p>Thank you for your recent inquiry.</p>
<p><br></p>
<p>We have provided a link to an electronic response package for your review and are confident that this literature will provide many of the answers that you have requested. Simply click on the link below and a new window will appear where you will have access to the provided literature.</p>
<p><br></p>
<p><a href=\""&response_document_link__v&"\">Click Here</a></p>
<p><br></p>
<p>If there is additional information you would like to have regarding our products, please do not hesitate to contact us. We will be most happy to be of assistance.</p>
<p><br></p>
<p>Thank you very much for giving us the opportunity to provide you the information that you are looking for.</p>
<p><br></p>
<p>Sincerely,</p>
<p><br></p>
<p>Verteo Medical Inquiry Team</p>"
~~~

#### Configuring the Compose Email Action

You must configure a _Compose Email_ <a href="/en/gr/59885/">entry or user action</a> on the _Case Response_ lifecycle. This allows users to generate the email from the template stored in the _Case Response Email Template_ object. When the _Compose Email_ action runs, Vault copies the _Reply To_ and _From_ field values on the _Case Response Email Template_ object, if present, to the _Case Response_ object record. Vault also evaluates the tokens in the _Subject_ and _Body_ fields and copies them to the _Subject_ and _Body_ fields on the _Case Response_ object. 

### Configuring the Send Response Package Action

You can configure the **Send Response Package** as a <a href="/en/gr/59885/">user or entry action</a> on applicable states in the _Case Response_ object lifecycle. 

The _Send Response Package_ action sends an email to the _Case Contact_ via a notification template. The body and subject are typically configured as the _Email Body_ field and _Email Subject_ field on the _Case Response_ object. If the _Email Body_ field uses rich text, the `;richtext` modifier should be included. Additional text and tokens can also be included in the notification template; for example, a disclaimer could be included in the bottom of the email.
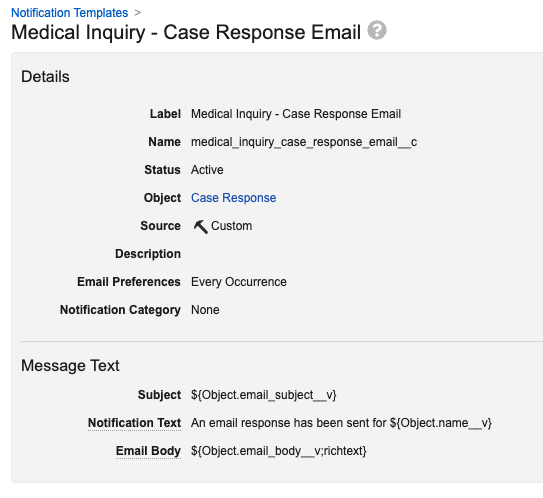
<a href="https://platform.veevavault.help/assets/images/26r1-medinquiry-case-response-email.png" data-lightbox="images" data-title="" data-alt="Email Body field including rich text">
  <img class="docimage" src="https://platform.veevavault.help/assets/images/26r1-medinquiry-case-response-email.png" alt="Email Body field including rich text" style="width: 600px;"  />
</a>

When configured as an entry action and used in conjunction with [automatic _Case Response_ creation][3], Vault can send _Acknowledgement Emails_ to HCPs.

### Enabling Document Downloads

You can also allow HCPs to download either the PDF rendition or the original source document from the response package. To enable these downloads, add the **Allow Document Download** and/or **Allow Source Download** field to the _Case Response_ page layout. Medical Inquiry users can then select the checkbox as required to allow HCPs to download source documents.

### Email Tracking {#email-tracking}

Medical Inquiry allows users to track the delivery status of email response packages and alerts users if a delivery fails.

To configure email tracking:

  1. Navigate to **Admin > Settings > Application Settings > Medical Inquiry**.
  2. Click **Edit**.
  3. Select the **Enable Email Tracking** checkbox.
  4. Click **Save**.

If Vault cannot deliver the response package email and email tracking is enabled, Vault moves the _Case Response_ record to the _Email Bounced_ state and sends a notification with the failure reason to the user that initially sent the response package. Vault also adds the failure reason to the audit trail on the _Case Response_ record. 

#### Reply To

You can set the _Reply To_ address on the _Case Response_ email. If the _Reply To_ field is left blank, Vault populates the field with the email address of the user performing the _Email Response_ user action. If the _Reply To_ field is added to the _Email Case Response_ page layout, the user can select a _Reply To_ address from a list of _Centralized Email Addresses_. You must configure the list of available _Centralized Email Addresses_ on the _Persons_ object in the **Business Admin > Objects** menu. The _Reply To_ address is typically configured to be the inbound Medical Inquiry email address. In this case, replies are automatically ingested into the system and are associated to the same _Case_ as the original inquiry.

To configure reply to functionality:

  1. Navigate to **Admin > Settings > Application Settings > Medical Inquiry**.
  2. Click **Edit**.
  3. Select the **Enable Reply To with Email Responses**. You cannot select this checkbox if email tracking is disabled.
  4. Click **Save**.

### Tracking External Views of Response Package Documents

Veeva MedInquiry tracks when the documents in a response package are accessed via the _Response Document Link_. 

When Vault sends a _Case Response_ email, it automatically creates a _Response Document Access_ object record for each document in the package to store the count, including the cover letter. If you regenerate the _Response Document_ link, Vault creates a new _Response Document Access_ record.  

The _Response Document Access Data Mining_ job updates the view and download counts for each _Response Document Access_ record. The job runs for a period from the last successful run date to ten minutes before the job starts. The job creates a new _Response Document Access_ record. 

<div class="note-border alert-info">
  <div class="alert alert-info" role="alert">
    <div><i class="far fa-info-circle"></i></div>
    <div class="alert-text">
      <p><strong>Note</strong>: Vault does not include views and downloads prior to 24R3 in these statistics and records.</p>
    </div>
  </div>
</div>


You must add a **Related Object** section for the **Response Document Access** to the _Case Response_ <a href="/en/gr/26387/#how-to-access-page-layouts">page layout</a> to allow Medical Inquiry users to view the document accesses. 

You can also create a <a href="/en/gr/3606/">custom report</a> using the _Response Document Access_ object to track the document views and downloads.

### Headers and Footers

By default, Medical Inquiry emails include a Vault header and footer. You can disable the header and footer by navigating to **Admin** > **Settings** > **Application Settings** and selecting the **Do not include Vault Email Header and Footer** checkbox.

### Associated Case Contacts and Colleagues

_Associated Case Contacts_ are additional email addresses  related to a _Case Contact_. An _Associated Contact_ must have a _Primary Case Contact_ assigned to it.  You can configure the page layout for the _Case Contact_ object to allow users to add _Associated Contacts_ from the primary _Case Contact's_ page. _Colleagues_ are individuals that work at the same pharmaceutical company as the case handler and want to receive case updates.

To add Associated Case Contacts, you'll need to first <a href="/en/gr/26387/#how-to-access-page-layouts">configure the</a> **_Case Contact_** page layout and add the _Associated Case Contacts_ section.

You can maintain the list of _Colleagues_, _Associated Case Contacts_, and _Centralized Email Addresses_ via the **Business Admin > Objects** menu. Navigate to the _Persons_ object, then click **Create** and select a **Person Type**.

### CC/BCC {#cc-bcc}

While assembling the _Case Response_, you can add _Case Contacts_, _Associated Contacts_, _Vault Medical Users_, and _Colleagues_ as **CC**/**BCC** recipients. To add CC/BCC recipients, you can add dedicated _CC_ & _BCC_ fields by navigating to **Admin > Configuration > Objects > Case Response > Layouts** and clicking the **Email Detail Page Layout**. Then, add the **CC** and **BCC** application controls and enter **Labels** and **Help Text**. Alternatively, you can <a href="/en/gr/26387/#add-edit-move-sections">add a _Related Object Section_</a> for the _Case Response Recipient Join_ object to the page layout. 

#### Automatic CC & BCC Recipients {#auto-cc-bcc}

You can also configure two actions on the _Case Response_ object lifecycle, to automatically add CC and BCC recipients to _Case Responses_.

The **Add CC or BCC to Email** entry or user action automatically creates a _Case Response Recipient_ join object relating the _Case Response_ to a _Person_ or _User_ field. You can define which _Person_ or _User_ record Vault uses when creating the join record using the _RecordByLabel_ function or by referencing a _Person or User_ object record field on the object. When adding the user action, we recommend entering a specific _Action Label_. For example, if you configure the action to CC the Medical Science Liaison, enter _CC the MSL_ as the _Action Label_.

The **Match or Create Person** entry or user action attempts to match an email address from a text field to an existing _Person_ record. If no matching _Person_ record exists, Vault creates a _Person_ record of the selected object type and sets any required fields using field defaults defined on the object and object type. This is especially useful for leveraging email addresses synced to text fields from external sources, such as Veeva CRM or a web form.

### Configuring From Email Addresses {#outbound-email}

Vault sends Medical Inquiry emails from a Veeva Vault domain address by default. You can configure Vault to allow users to change the sender email address to one associated with your organization.

Before configuring _From_ email addresses, you must first add one or more <a href="/en/gr/78114/">Outbound Email Domains</a>.

To configure _From_ email addresses:

  1. Navigate to **Admin > Configuration > Objects**.
  2. Click **Person** and click the <a href="/en/gr/32857/">**Object Types**</a> tab.
  3. Verify that the **From Email Address** object type is enabled.
  4. Return to **Admin > Configuration > Objects**.
  5. Click **Case Response**.
  6. Click the **Page Layouts** tab and click **Case Response Detail <a href="/en/gr/26387/#how-to-access-page-layouts">Page Layout</a>**.
  7. Click **Add** and select **From**.
  8. Click **Save**.

You can also define which _From_ email address Vault applies by creating a formula using the <a href="/en/gr/52324/#other-functions">RecordByLabel function</a>.

### Deleting Case Response Emails

Vault stores case response emails in _Case Response Email_ object records. When configured, Admins and users with the _Delete Case Response Emails_ object action permission can click the **Actions** menu and select the **Delete Email** <a href="/en/gr/43127/#assign-actions">user action</a> to delete the object records. This permission is enabled on the standard System Admin or Vault Owner security profile.

<div class="note-border alert-info">
  <div class="alert alert-info" role="alert">
    <div><i class="far fa-info-circle"></i></div>
    <div class="alert-text">
      <p><strong>Note</strong>: The <em>Delete Email</em> user action permanently deletes the record. It cannot be retrieved afterward.</p>
    </div>
  </div>
</div>


To create the user action:

  1. Navigate to **Admin > Configuration > Objects > Case Response Email**.
  2. Click the **Actions** tab.
  3. Click **Create**.
  4. In the _Select Action_ dialog, select **Delete Email** and click **Continue**.
  5. Optional: Add a description for the user action.
  6. Click **Save**.

Users must have the _Delete Case Response Emails_ <a href="/en/gr/43127/#action_level_security">object action permission</a> to delete _Case Response Email_ object records.

### Revoking Case Response Links

When configured, Admins and Medical Inquiry users can click the **Actions** menu and select the **Revoke Response Link** user action to revoke access to the _Response Document_ link. You can also configure an entry action on the _Standard Response_ lifecycle to automatically revoke access to _Response Document_ links related to a _Standard Response_. Vault updates the _Response Link Revoked On_ field with the date and time the link is manually or automatically revoked. 

Before configuring the user and entry actions, you must configure the _Response Link Revoked On_ field:

  1. Navigate to **Admin > Configuration > Objects > Case Response**.
  2. Click the **Object Types** tab.
  3. Click the **Actions** menu, then click **Edit Object Type Fields**.
  4. Select the checkbox to enable the **Response Link Revoked On** field for the **Email** object type.
  5. Click **Save**.
  6. Click the **Page Layouts** tab.
  7. Click **Email Detail Page Layout**.
  8. Verify that the **Response Link Revoked On** field is visible under _Case Details_. If not, click **Add** and select the field, then click **Save**.

To add the user action to the _Case Response_ lifecycle:

  1. Navigate to **Admin > Configuration > Objects > Case Response**.
  2. Under _Actions_, click **Create**.
  3. Select **Revoke Response Link** and click **Continue**.
  4. Navigate to **Admin > Configuration > Object Lifecycles > Case Response**.
  5. Under _States_, click **Response Sent**.
  6. Under _User Actions_, click **Edit**.
  7. Click **Create Rule**.
  8. Select **Always** and **Revoke Response Link**.
  9. Click **Save**.

To add the user action to the _Standard Response_ lifecycle:

  1. Navigate to **Admin > Configuration > Objects > Standard Response**.
  2. Under _Actions_, click **Create**.
  3. Select **Revoke Response Link** and click **Continue**.
  4. Navigate to **Admin > Configuration > Object Lifecycles > Standard Response**.
  5. Under _States_, click **Requires Package Review**.
  6. Under _User Actions_, click **Edit**.
  7. Click **Create Rule**.
  8. Select **Always** and **Revoke Response Links**.
  9. Click **Save**.

To add the entry action to the _Standard Response_ lifecycle:

  1. Navigate to **Admin > Configuration > Object Lifecycles > Standard Response**.
  2. Under _States_, click **Requires Package Review**.
  3. Under _Entry Actions_, click **Edit**.
  4. Click **Create Entry Action**.
  5. Select **Always** and **Revoke Response Links**.
  6. Click **Save**.

### Responding to Multiple Inquiries in One Response {#responding-to-multiple-inquiries-in-one-response}

HCPs often submit multiple requests for medical information in one inquiry. Instead of answering and sending a response package for each individual request, you can configure Vault to allow users to bundle multiple answers in one _Case Response_. This _Response_ includes links to each individual answer.

To respond to multiple requests for information in one single response, within one _Case_, you must bundle available _Responses_ (the answers to the _Case Requests_) into one main _Email_, _Phone_, _Fax_, or _Standard Mail_ response. This _Fulfillment_ includes a _Response List_, which shows the relevant response package links.

The following actions allow you to quickly group _Responses_ and draft a _Response List_:

  * _Case_
    * **Create Case Response**: This user action creates a _Case Response_ record from the _Case_. You must configure the type of _Case Response_ created. For example, if you would like your users to fulfill a _Case Response_ via _Email_, you must define that as the object type to be used when creating the _Response_. When the action executes, the _Case Response_ created automatically includes all _Responses_ associated with the _Case_ in the _Ready for Fulfillment_ lifecycle state. 
  * _Case Request_
    * **Create Case Response:** This user action functions similarly to the one above, but from the _Case Request._ When the action executes, the _Case Response_ created automatically includes all _Responses_ associated with the _Case_ in the _Ready for Fulfillment_ lifecycle state. 
  * _Case Response_
    * **Create Case Response:** This user action functions similarly to the one above, but from a _Case Response_ with the _Response_ type. When the action executes, the _Case Response_ created automatically includes the _Response_ from which it was created, as long as the _Response_ is in the _Ready for Fulfillment_ lifecycle state.
    * **Add/Remove Responses**: This user action opens a dialog where you can add or remove the _Responses_ you would like to include in a _Fulfillment_.
    * **Update Response List**: This user and/or entry action updates the _Response List_, which is the list of _Responses_ to be included in a _Fulfillment_. You can then use the _Response List_ in emails and cover letters.

### Generating & Attaching Case Reports to Case Responses & Events {#case-reports}

You can configure the **Generate and Attach Case Report** action as a user or entry action on the _Event_ and _Case Response_ objects. This action generates a case report based on the parent _Case_ record and attaches it to the record where the action runs. When configuring the action, you can select the <a href="/en/gr/796234/">Microsoft Word formatted output template</a> Vault should use, such as the _Case Report for Attachment_ template or a custom template. 

Vault generates the case report asynchronously, and sends a notification via the Notification bell and email to the initiating user. 

## Configuring Inbound Email Mapping

If configured by an Admin, Vault can automatically populate required fields like _Country_, _Language_, and _Organization_ on a _Case_ or _Case Request_ record based on the inbound email address used by the sender. When a sender submits an inquiry to a designated email address, Vault can create a _Case_ or _Case Request_ and fill in the mapped fields. This automation minimizes manual data intake for case intake teams and ensures that _Cases_ and _Case Requests_ contain the data required for accurate routing and reporting.

Admins can use the _Inbound Email Address Mapping Group_ component to select a standard mapping group and create a mapping record that links a designated email address to the unique identifier (UUID) of a target record.

### Configuration Prerequisites

Before configuring the field mappings, Admins must complete the following steps:

1. Ensure that <a href="/en/gr/74659/">inbound email addresses</a> are configured.
2. Ensure that inbound email addresses have a one-to-one relationship with a field mapping (for example, one email address to one country).
3. Ensure that you have correct _Country_ and _Language_ pairs identified (for example, Germany: German, Canada: French), or case creation will fail when the email is ingested.
4. Ensure that the records used to automatically populate _Cases_ or _Case Requests_ have UUIDs assigned. If you create a custom mapping for an object, you may have to create a custom UUID field on the object.
5. Ensure that only reference fields are used in the mappings.

### Mapping an Inbound Email Address to a Country, Language, or Organization

The _Inbound Email Address Mapping Group_ component includes three standard mapping groups: _Inbound Email Countries_, _Inbound Email Languages_, and _Inbound Email Organizations_.

To configure a standard field mapping:

1. Navigate to **Admin > Configuration > Application Configurations > Inbound Email Address Mapping Group**.
2. Select a standard group like **Inbound Email Countries**.
3. Click **Create**.
4. Enter a **Label** to describe what the mapping is for, and ensure that the **Name** (API key) is automatically generated.
5. Enter the **UUID** for the target record in the **Unique Identifier** field.
6. Select the appropriate email address from the **Inbound Email Address** list.
7. Click **Save**.

You can add multiple inbound email address mappings to an _Inbound Email Address Mapping Group_ as needed. When an email is sent to the designated email address, Vault automatically populates the corresponding fields on the generated _Case_ or _Case Request_ record. If the inbound email address does not have field mapping configured, the fields remain blank for manual entry.

To configure a custom field mapping:

1. Navigate to **Admin > Configuration > Application Configurations > Inbound Email Address Mapping Group**.
2. Click **Create**.
3. Enter a **Label** to identify the mapping group, and ensure that the **Name** (API key) for the mapping group is automatically generated.
4. Enter a **Target Object**, such as _Case_ or _Case Request_, and enter the **API key** for the **Target Field** being populated on the Target Object.
5. Enter a **Referred Object** to indicate what object the mapping group is receiving information from. 
6. Enter a **Referred Field** to list the UUID from that object for identifying the appropriate record.
7. Click **Save**.
8. Expand the **Inbound Email Address Mappings** section, and click **Create**.
9. Enter a **Label** to describe what the mapping is for, and ensure that the **Name** (API key) is automatically generated.
10. Enter the **UUID** for the target record in the **Unique Identifier** field.
11. Select the appropriate email address from the **Inbound Email Address** list.
12. Click **Save**.

After the custom field mapping is complete, when an email is sent to the designated address, Vault automatically populates the Target Field on the new _Case_ or _Case Request_ record using the value retrieved from the Referred Field, as defined in the mapping.

## Configuring the Case Intake Form {#case-intake-form}

The _Case Intake_ form allows users to enter values for fields in the _Case_, _Case Request_, and _Case Response_ objects from a single intake form that you can customize to suit your organization's needs. To enable this, navigate to **Admin** > **Settings** > **Application Settings** > **Medical Inquiry** and select the **Enable Case Intake Form** checkbox.

You can edit the _Case Intake_ object to <a href="/en/gr/26387/">customize the layout</a> and <a href="/en/gr/15057/#how_to_add_object_fields">add custom fields</a> to the _Case Intake_ Form. If you have added any custom fields to the _Case_, _Case Request_, or _Case Response_ objects, you should also add corresponding fields to the _Case Intake_ object. Vault maps _Case Intake_ fields to the corresponding objects based on the name, plus a prefix that determines which object contains the corresponding field:

  * `case_` for the _Case_ object
  * `creq_` for the _Case Request_ object
  * `cres_` for the _Case Response_ object

For example, Vault pushes data entered into the `cres_response_extras__c` field on the _Case Intake_ form into the `response_extras__c` field on a case's _Case Response_ object record.

Note the following:

  * If a field is required on the _Case_ object, it should be required on the _Case Intake_ object. If it is required on the _Case Request_, or _Case Response_ object, add a <a href="/en/gr/46866/">validation rule</a> on the _Case Intake_ object to ensure the user populates the field on the _Case Intake_ form.
  * If you have changed any of the standard fields that are required by default on the _Case_, _Case Request_, or _Case Response_ object, inactivate the corresponding validation rule on the _Case Intake_ object.
  * If you use custom _Case Response_ types, add a picklist value to the _Case Response Type_ picklist whose name exactly matches the name of the custom _Case Response_ object type.

Failure to add required custom fields from these objects results in an error when a user saves a new case.

## Configuring Telephony Support {#telephony}

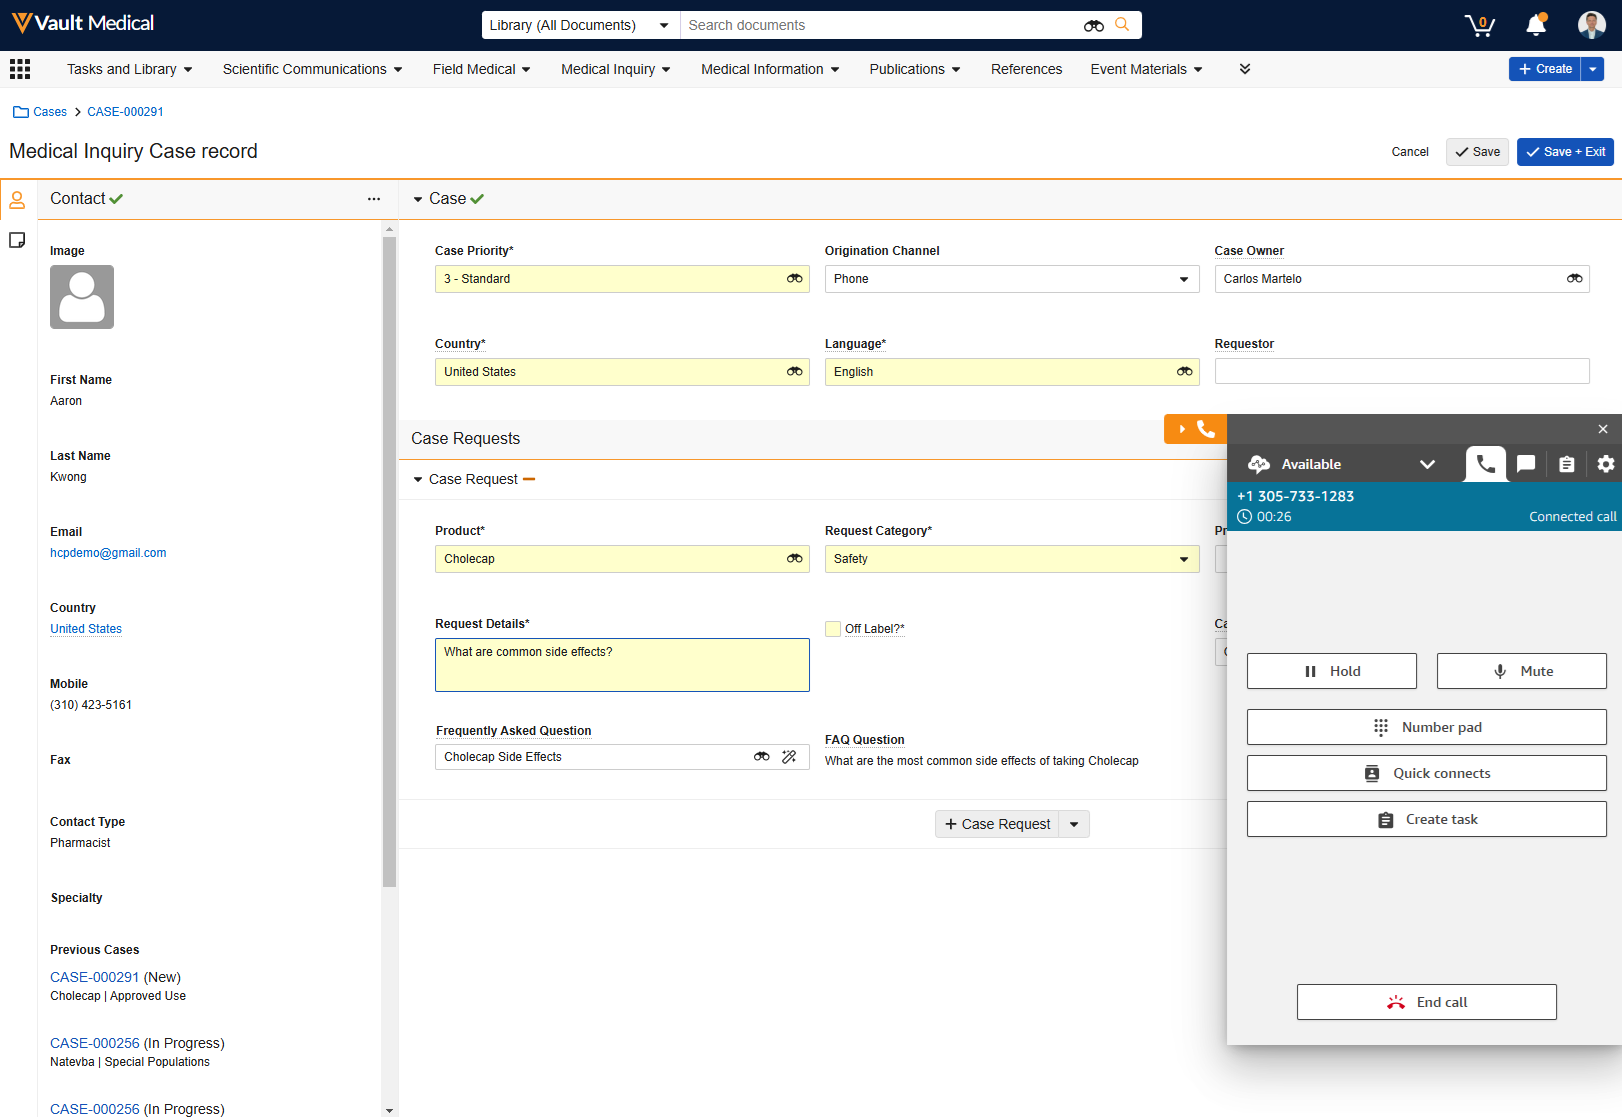
Telephony support allows users to accept, reject, and make phone calls within Vault. Users can leverage this functionality to speed up the inquiry intake process and log inbound calls in _Conversation_ object records. 

<a href="https://platform.veevavault.help/assets/images/Telephony_Support_24R3.png" data-lightbox="Telephony_Support_24R3.png" data-title="" data-alt="Telephony Support in Vault Medical">
  <img class="docimage" src="https://platform.veevavault.help/assets/images/Telephony_Support_24R3.png" alt="Telephony Support in Vault Medical" style="max-width: 60%;"  />
</a>

Before configuring telephony support, you must navigate to **Admin > Configuration > Objects > User > Fields** and activate the **Omnichannel Connection** field. 

Telephony support configuration depends on the telephony provider you want to integrate with MedInquiry. You may opt to use a standard integration with Amazon Connect or Genesys Cloud or create your own integration with another telephony service provider.

### Amazon Connect

To configure telephony support with <a class="external-link " href="https://docs.aws.amazon.com/connect/latest/adminguide/what-is-amazon-connect.html" target="_blank" rel="noopener">Amazon Connect<i class="fa fa-external-link" aria-hidden="true"></i></a>, you must first edit the _Connection_ record:

  1. Navigate to **Admin > Connections**.
  2. Click **Amazon Connect**.
  3. Click **Edit**.
  4. Enter your **Amazon Connect Instance URL**.
  5. You may update the provisioned <a href="/en/gr/58198/">reference lookups</a> and <a href="/en/gr/62154/#about-field-rules">field rules</a> as needed. MedInquiry uses reference lookups and field rules to accept data from Amazon Connect. For example, to add **Live Chat** to the **Amazon Connect** _Connection_, add the following reference lookups:
      * _Case Origination Channel_:
          * _Lookup Type_: **Picklist**
          * _Target Object_: **`case_origination_channel__v`**
          * _Source Key_: **CHAT**
          * _Target Key_: **`chat__v`**
          * _Status_: **Active**
      * _Direction for live chat_:
          * _Lookup Type_: **Picklist**
          * _Target Object_: **`conversation_direction__v`**
          * _Source Key_: **API**
          * _Target Key_: **`inbound__v`**
          * _Status_: **Active**
      * Update the **Source Key** field on the _Phone_ reference lookup to **VOICE**.
  6. Click **Save** each time you create or update a reference lookup.

Next, you must update <a href="/en/gr/70162/">user profiles</a> and permissions:

  1. Navigate to **Admin > Users & Groups**.
  2. On the applicable user profiles, click **Edit** and select the **Amazon Connect** _Connection_ record in the _Omnichannel Connection_ field.
  3. Click **Save**.
  4. Add **Read** <a href="/en/gr/22824/">permissions</a> on the following objects to the permission set(s) assigned to telephony users: _Reference Lookup_, _Connection_ (_External_ object type), _Conversation_ (_Phone_ and _Chat_ object types), and _Omnichannel Settings_.
  5. Update or create <a href="/en/gr/25494/">Custom Sharing Rules</a> to allow the relevant users to see _Conversation_ records created by other users.

Then, you must update the **Case Origination Channel** picklist:

  1. Navigate to **Business Admin > Picklists > Case Origination Channel**.
  2. Click **Edit**.
  3. Set the following picklist values to **Active** in the _Status_ drop-down:
      * **Phone** (`phone__v`)
      * **Email** (`email__v`)
      * **Web Form** (`web_form__v`)
      * **Chat** (`chat__v`)
      * **Fax** (`fax__v`)
  4. Optional: We recommend inactivating any custom **Case Origination Channel** picklist values.
  5. Click **Save**. 

Next, you must update objects and <a href="/en/gr/26387/">page layouts</a>:

  1. Navigate to **Admin > Configuration > Objects > Case > Layouts**.
  2. Add a related object section for the **Conversations** object and select the **Prevent record creation** option under _Creation Option_.
  3. Navigate to **Configuration > Objects > Conversation**.
  4. Activate the **Chat** and **Phone** action layouts.

Finally, you must configure the connection in AWS:

  1. <a class="external-link " href="https://docs.aws.amazon.com/connect/latest/adminguide/app-integration.html" target="_blank" rel="noopener">Add your Vault URL as an _Approved origin_<i class="fa fa-external-link" aria-hidden="true"></i></a>. You may need to perform <a class="external-link " href="https://docs.aws.amazon.com/connect/latest/adminguide/amazon-connect-get-started.html" target="_blank" rel="noopener">additional configuration<i class="fa fa-external-link" aria-hidden="true"></i></a> depending on your Amazon Connect implementation. 
  2. <a class="external-link " href="https://docs.aws.amazon.com/connect/latest/adminguide/create-contact-flow.html" target="_blank" rel="noopener">Create a flow<i class="fa fa-external-link" aria-hidden="true"></i></a> or update the flows you use to handle phone calls and live chat requests.
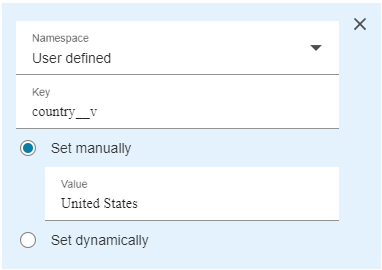
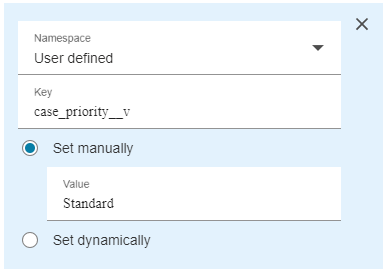
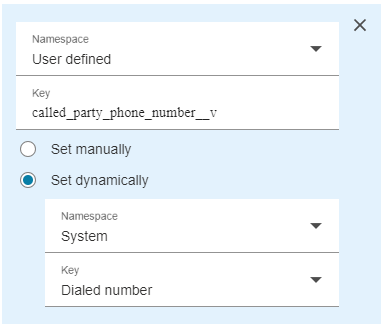
  3. Add the following fields to the **Set contact attributes** block in the flow and select **Set dynamically** for each:
      * **`called_party_phone_number__v`**, **Dialed number** <br> <a href="https://platform.veevavault.help/assets/images/Called_Party_Phone_Number_Telephony_24R3.png" data-lightbox="Called_Party_Phone_Number_Telephony_24R3.png" data-title="" data-alt="Called Party Phone Number">
  <img class="docimage" src="https://platform.veevavault.help/assets/images/Called_Party_Phone_Number_Telephony_24R3.png" alt="Called Party Phone Number" style="max-width: 30%;"  />
</a> <br>
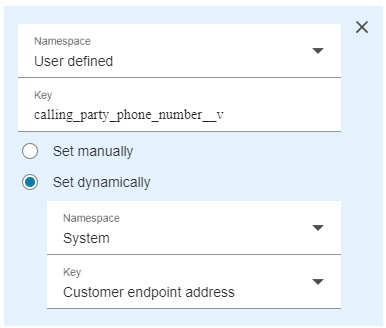
      * **`calling_party_phone_number__v`**, **Customer endpoint address** <br> <a href="https://platform.veevavault.help/assets/images/Calling_Party_Phone_Number_Telephony_24R3.png" data-lightbox="Calling_Party_Phone_Number_Telephony_24R3.png" data-title="" data-alt="Calling Party Phone Number">
  <img class="docimage" src="https://platform.veevavault.help/assets/images/Calling_Party_Phone_Number_Telephony_24R3.png" alt="Calling Party Phone Number" style="max-width: 30%;"  />
</a> <br>
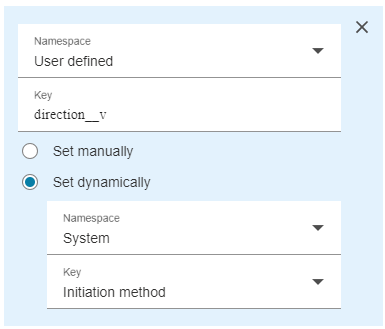
      * **`direction__v`**, **Initiation method** <br> <a href="https://platform.veevavault.help/assets/images/Direction_Telephony_24R3.png" data-lightbox="Direction_Telephony_24R3.png" data-title="" data-alt="Direction">
  <img class="docimage" src="https://platform.veevavault.help/assets/images/Direction_Telephony_24R3.png" alt="Direction" style="max-width: 30%;"  />
</a> <br>
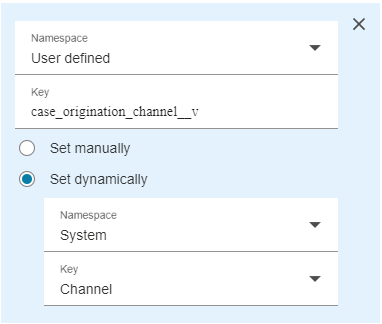
      * **`case_origination_channel__v`**, **Channel** <br> <a href="https://platform.veevavault.help/assets/images/Case_Origination_Channel_Telephony_24R3.png" data-lightbox="Case_Origination_Channel_Telephony_24R3.png" data-title="" data-alt="Case Origination Channel">
  <img class="docimage" src="https://platform.veevavault.help/assets/images/Case_Origination_Channel_Telephony_24R3.png" alt="Case Origination Channel" style="max-width: 30%;"  />
</a> <br>
      * Optional: Capture _Language_ and _Country_ values in your flow and add them to the **Set contact attributes** step. Vault includes reference lookups for the _Language_ and _Country_ fields. Ensure that the _Country_ and _Language_ values from the telephony provider match the values defined in the reference lookup records. <br> <a href="https://platform.veevavault.help/assets/images/Language_Telephony_24R3.png" data-lightbox="Language_Telephony_24R3.png" data-title="" data-alt="Language">
  <img class="docimage" src="https://platform.veevavault.help/assets/images/Language_Telephony_24R3.png" alt="Language" style="max-width: 30%;"  />
</a> <br> <a href="https://platform.veevavault.help/assets/images/Country_Telephony_24R3.png" data-lightbox="Country_Telephony_24R3.png" data-title="" data-alt="Country">
  <img class="docimage" src="https://platform.veevavault.help/assets/images/Country_Telephony_24R3.png" alt="Country" style="max-width: 30%;"  />
</a> <br>
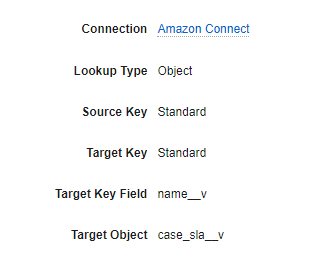
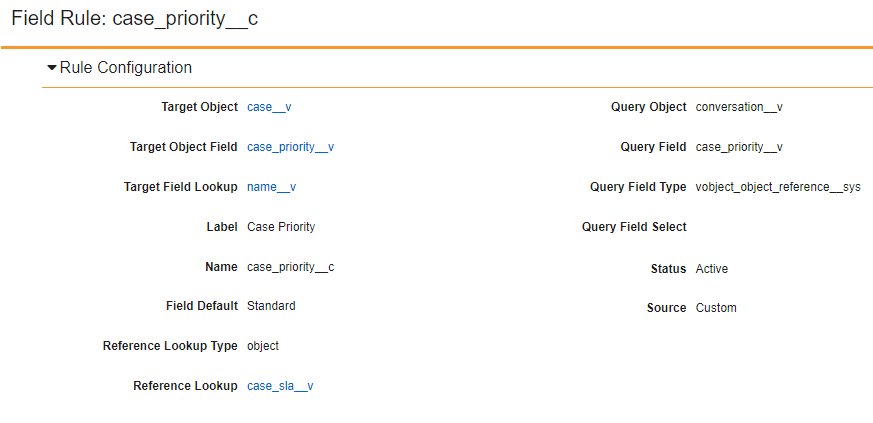
      * Optional: Capture _Case Priority_ values in your flow and add them to the **Set contact attributes** step. You must also create a reference lookup and an associated field rule for _Case Priority_ in your Vault. <br> <a href="https://platform.veevavault.help/assets/images/Case_Priority_Telephony_24R3.png" data-lightbox="case-priority" data-title="" data-alt="Case Priority">
  <img class="docimage" src="https://platform.veevavault.help/assets/images/Case_Priority_Telephony_24R3.png" alt="Case Priority" style="max-width: 30%;"  />
</a> <a href="https://platform.veevavault.help/assets/images/Case_Priority_Reference_Lookup_Telephony_24R3.png" data-lightbox="case-priority" data-title="" data-alt="Case Priority reference lookup">
  <img class="docimage" src="https://platform.veevavault.help/assets/images/Case_Priority_Reference_Lookup_Telephony_24R3.png" alt="Case Priority reference lookup" style="max-width: 30%;"  />
</a> <a href="https://platform.veevavault.help/assets/images/Case_Priority_Field_Rule_Telephony_24R3.png" data-lightbox="case-priority" data-title="" data-alt="Case Priority field rule">
  <img class="docimage" src="https://platform.veevavault.help/assets/images/Case_Priority_Field_Rule_Telephony_24R3.png" alt="Case Priority field rule" style="max-width: 30%;"  />
</a>

### Genesys Cloud

To configure telephony support with <a class="external-link " href="https://developer.genesys.cloud/" target="_blank" rel="noopener">Genesys Cloud<i class="fa fa-external-link" aria-hidden="true"></i></a>, you must first edit the _Connection_ record:

  1. Navigate to **Admin > Connections**.
  2. Click **Genesys Cloud**.
  3. Click **Edit**.
  4. In the _URL_ field, enter the iframe URL. For example, `https://apps.usw2.pure.cloud/crm/embeddableFramework.html`.
  5. You may update the provisioned <a href="/en/gr/58198/">reference lookups</a> and <a href="/en/gr/62154/#about-field-rules">field rules</a> as needed. MedInquiry uses reference lookups and field rules to accept data from Genesys Cloud.
  6. Click **Save**.

Next, you must update <a href="/en/gr/70162/">user profiles</a> and permissions:

  1. Navigate to **Admin > Users & Groups**.
  2. On the applicable user profiles, click **Edit** and select the **Genesys Cloud** _Connection_ record in the _Omnichannel Connection_ field.
  3. Click **Save**.
  4. Add **Read** <a href="/en/gr/22824/">permissions</a> on the following objects to the permission set(s) assigned to telephony users: _Reference Lookup_, _Connection_ (_External_ object type), _Conversation_ (_Phone_ and _Chat_ object types), and _Omnichannel Settings_.
  5. Update or create <a href="/en/gr/25494/">Custom Sharing Rules</a> to allow the relevant users to see _Conversation_ records created by other users.

Then, you must update the **Case Origination Channel** picklist:

  1. Navigate to **Business Admin > Picklists > Case Origination Channel**.
  2. Click **Edit**.
  3. Set the following picklist values to **Active** in the _Status_ drop-down:
      * **Phone** (`phone__v`)
      * **Email** (`email__v`)
      * **Web Form** (`web_form__v`)
      * **Chat** (`chat__v`)
      * **Fax** (`fax__v`)
  4. Optional: We recommend inactivating any custom **Case Origination Channel** picklist values.
  5. Click **Save**. 

Next, you must update objects and <a href="/en/gr/26387/">page layouts</a>:

  1. Navigate to **Admin > Configuration > Objects > Case > Layouts**.
  2. Add a related object section for the **Conversations** object and select the **Prevent record creation** option under _Creation Option_.
  3. Navigate to **Configuration > Objects > Conversation**.
  4. Activate the **Chat** and **Phone** action layouts.

Finally, you must configure the connection in Genesys:

  1. In Genesys, navigate to **Admin > Organization Settings > Settings** and enable **Restrict Genesys Cloud Embedding**.
  2. Under <a class="external-link " href="https://developer.genesys.cloud/platform/embeddable-framework/deployments/private-deployment#genesys-cloud-organization-settings" target="_blank" rel="noopener">_Allowed Embeddable Domains_<i class="fa fa-external-link" aria-hidden="true"></i></a>, enter **`*.veevavault.com`**.
  3. <a class="external-link " href="https://help.mypurecloud.com/articles/create-an-oauth-client/" target="_blank" rel="noopener">Create an OAuth client<i class="fa fa-external-link" aria-hidden="true"></i></a> for the Genesys Cloud Embeddable Framework. Ensure that the _Grant Type_ is set to **Token Implicit Grant (Browser)**.
  4. Ensure the **Authorized redirect URIs** include the region relevant to your implementation.
  5. Add a <a class="external-link " href="https://help.mypurecloud.com/articles/add-a-private-genesys-cloud-embeddable-framework-integration/" target="_blank" rel="noopener">**Private Genesys Cloud Embeddable Framework** integration<i class="fa fa-external-link" aria-hidden="true"></i></a>. This requires uploading a `framework.js` file to Genesys Cloud. This file includes configuration data such as a list of attributes which may be sent to MedInquiry from Genesys Cloud. For more information, visit the <a class="external-link " href="https://help.mypurecloud.com/articles/genesys-cloud-embeddable-framework-deployment-options/" target="_blank" rel="noopener">Genesys Cloud Resource Center<i class="fa fa-external-link" aria-hidden="true"></i></a>.
  6. Create or update <a class="external-link " href="https://help.mypurecloud.com/articles/create-call-flow/" target="_blank" rel="noopener">inbound<i class="fa fa-external-link" aria-hidden="true"></i></a> and <a class="external-link " href="https://help.mypurecloud.com/articles/create-outbound-call-flow/" target="_blank" rel="noopener">outbound flows<i class="fa fa-external-link" aria-hidden="true"></i></a> and queues as needed.
  7. We recommend that you create or update call flows with a **Set Participant Data** step, which defines the call or live chat attributes that you want Genesys Cloud to share with MedInquiry. See the following examples.
     1. Call flow step: Set Participant Data
           1. **`country__v`**
           2. **`language__v`**
           3. **`location__v`**
     2. Origination Channel
           1. Attribute Name: **`case_origination_channel__v`**
           2. Value To Assign: **`phone__v`**
     3. Country
           1. Attribute Name: **`country__v`**
           2. Value To Assign: **United States**
     4. Language
           1. Attribute Name: **`language__v`**
           2. Value To Assign: **English**
     5. Location: This is a helpful URL that may display in MedInquiry which redirects users to the call or live chat record in Genesys. You may use the following expression in the <a class="external-link " href="https://help.mypurecloud.com/articles/build-customized-output-with-the-communication-sequence-builder/" target="_blank" rel="noopener">Genesys String Builder<i class="fa fa-external-link" aria-hidden="true"></i></a> to assign a value to the `location__v` attribute:  `https://{{Genesys Cloud URL}}/directory/#/analytics/interactions/" + Call.ConversationId + "/admin/details"` , where `{{Genesys Cloud URL}}` is the URL shown in your Genesys Cloud console. 
     6. Case Priority
           1. Attribute Name: **`case_priority__v`**
           2. Value To Assign: **Standard**
           3. You must also create a reference lookup and an associated field rule for _Case Priority_ in your Vault.


<div class="note-border alert-info">
  <div class="alert alert-info" role="alert">
    <div><i class="far fa-info-circle"></i></div>
    <div class="alert-text">
      <p><strong>Note</strong>: To use telephony support with Genesys, you must purchase the <a class="external-link " href="https://appfoundry.genesys.com/filter/genesyscloud/listing/71f37bef-77b1-4d8d-afbd-72dce062727c" target="_blank" rel="noopener">Genesys Cloud Voice app<i class="fa fa-external-link" aria-hidden="true"></i></a>.</p>
    </div>
  </div>
</div>


### Other Providers {#other-providers}

To configure telephony support with an alternate Computer Telephony Integration (CTI) app, you must first configure a provider:

  1. Navigate to **Admin > Connections** and create a **Connection** record.
  2. In the _Connection Type_ drop-down, select **External**.
  3. Populate the following fields:
      * **Name**
      * **URL**
  4. Click **Save**.

<div class="note-border alert-info">
  <div class="alert alert-info" role="alert">
    <div><i class="far fa-info-circle"></i></div>
    <div class="alert-text">
      <p><strong>Note</strong>: The <strong>URL</strong> is the URL for the call controls interface. You must copy this URL from your provider.</p>
    </div>
  </div>
</div>


Next, you must update <a href="/en/gr/70162/">user profiles</a> and permissions:

  1. Navigate to **Admin > Users & Groups**.
  2. On the applicable user profiles, click **Edit** and select the created **Omnichannel Connection** _Connection_ record in the _Omnichannel Connection_ field.
  3. Click **Save**.
  4. Add **Read** <a href="/en/gr/22824/">permissions</a> on the following objects to the applicable permission set(s): _Reference Lookup_, _Connection_ (_External_ object type), and _Conversation_ (_Phone_ and _Chat_ object types).
  5. Update or create <a href="/en/gr/25494/">Custom Sharing Rules</a> to allow the relevant users to see _Conversation_ records created by other users.

Then, you must create <a href="/en/gr/58198/">reference lookups</a>, <a href="/en/gr/62154/#create-int-rule">integration rules</a>, and <a href="/en/gr/62154/#create-field-rule">field rules</a> as needed to map fields between the CTI app and Vault Medical.

### Configuring the Omnichannel JS API

Once you configure the provider, you can download and configure the Omnichannel JS API. You must upload the Omnichannel JS API and map methods and API endpoints from the telephony provider to methods from the Omnichannel JS API package. Learn more in the <a class="external-link " href="https://developer.veevavault.com/omniconnect/" target="_blank" rel="noopener">Developer Documentation<i class="fa fa-external-link" aria-hidden="true"></i></a>.

Some telephony providers offer embeddable interfaces. If you do not use one of these providers, you must create a custom interface using an HTML/CSS/JS package.

System Administrators and Vault Owners receive an email notification and see a <a href="/en/gr/71440/">notification</a> in Vault if Vault fails to create or update a _Conversation_ record. 

### Configuring Omnichannel Settings Records

After configuring the connection with one or more providers, you can create and edit settings for Omnichannel providers. To access these records, navigate to **Business Admin > Objects > Omnichannel Settings**. If your configuration uses Amazon Connect or Genesys Cloud, click the desired record. If you are using another provider, click **Create**. You can customize the call window by editing the **Height** and **Width** fields.

### Configuring Outbound Telephony {#outbound-telephony}

After configuring your provider, you can also configure outbound telephony, which allows telephony users to call _Case Contacts_ directly from the _Case_ or _Case Contact_ record.

To configure outbound telephony:

  1. Navigate to **Admin > Objects > Case**.
  2. Click the **Layouts** tab, then click the **Case** layout.
  3. Click **Edit**.
  4. Under _Case Details_, click **Add**.
  5. Select **Phone Control**.
  6. Optional: Click <i class="far fa-pencil-alt"></i>. **Edit** to update the **Label** and **Help** fields, then click **Done**.
  7. Click **Save**.
  8. Navigate to **Objects > Case Contact**.
  9. Repeat steps 2 through 7 to add the **Phone Control** to the **Case Contact** layout.

#### About the Phone Control

The phone book allows users to manage _Phone_ type _Contact Information_ records. When configured, telephony users can click <img class="inline" src="https://platform.veevavault.help/assets/images/fa-address-card.png" alt="Phone Book Icon" style="" /> to open the phone book or click <img class="inline" src="https://platform.veevavault.help/assets/images/fas-phone-arrow-up-right.png" alt="Dial Icon" style="" /> to initiate a call. If telephony users are not logged in to their telephony provider, the <img class="inline" src="https://platform.veevavault.help/assets/images/fas-phone-arrow-up-right.png" alt="Dial Icon" style="" /> is greyed out.

Vault does not display the <img class="inline" src="https://platform.veevavault.help/assets/images/fas-phone-arrow-up-right.png" alt="Dial Icon" style="" /> to non-telephony users. However, they can open the phone book to manage _Phone_ records.

## Configuring the Phone Field Control for Case Contacts {#phone-field-control}

You can add the _Phone_ field control to the page detail layouts on the _Phone Person Information_, the _Fax Person Information_, and the _Organization Information_ objects. This field control allows users to select a country's phone code and enter a phone or fax number on a _Case Contact_ or _Organization_ record. Numbers entered in this field are validated and displayed in the correct international phone or fax number standard format based on the country selected.

## Configuring Automated Email Intake for Medical Inquiries {#automated-email-intake}

The <a href="/en/gr/74285/">_Email to Vault_</a> feature allows Vault to receive emails directly via an inbound email address and store them as an _Email_ object record. Vault users can leverage this functionality to automate the _Medical Inquiry_ intake process. Once configured, Vault can receive emails from HCPs and automatically create a new inquiry or add to an existing record.

Before configuring automated intake for _Medical Inquiry_, ensure that <a href="/en/gr/52757/#email-tracking">_Email Tracking_</a> is enabled. You must also configure the <a href="/en/gr/74285/">**Email to Vault**</a> feature, create at least one inbound email address for _Medical Inquiry_ where the _Email Processor_ field is set to _Medical Inquiry_, and verify that the _Always Run As Email Processor User_ checkbox is selected for the _Medical Inquiry Email Processor_. 

### Automatically Redirecting Emails

You can configure your medical information team email to redirect all emails to Vault, rather than manually forwarding them. If the inquiry is addressed to another team, or considered spam, users can forward or delete the Case after Vault creates the record. When emails are automatically redirected to Vault, Vault matches the _Case Contact_ based on the "From" field in the email. 

To configure automated intake for Medical Inquiries by automatically redirecting emails, configure the **Email to Vault** feature and create at least one inbound email address for _Medical Inquiry_ where the _Email Processor_ field is set to _Medical Inquiry Email Processor_. Then, continue the configuration process by updating the [page layout][4].

### Manually Forwarding Emails to Vault

You can also manually forward individual emails to Vault. We recommend manually forwarding emails if your organization uses the medical information team email for multiple purposes, and you only want to create _Cases_ for specific emails. When emails are manually forwarded to Vault, Vault matches the _Case Contact_ based on the _Original Sender_, the person who sent the email to the medical information team email.

Vault attempts to confirm if the email was forwarded based on whether the receiving address is defined as a _Forwarding Email Address_. If Vault determines the email was forwarded, it populates the _Original Sender_ field with the first email address after the "From": attribution block and any forwarding text.

Vault leaves the _Original Sender_ field blank if it determines that the email was not forwarded, or was forwarded without an attribution block.

To configure automated intake for Medical Inquiries by manually forwarding emails, configure the **Email to Vault** feature and create at least one _Inbound Email Forwarding Address_ for each of the email addresses from which emails will be forwarded. Select _Medical Inquiry Email Processor_ in the _Email Processor_ field. Then, continue the configuration process by updating the page layout.

### Page Layout {#medinq-email-intake-page-layout-config}

To configure automated _Medical Inquiry_ intake, you must first configure the _Case Request_ page layout:

  1. Navigate to **Configuration > Objects > Case Request > Page Layouts**.
  2. Click **Case Request Detail Page Layout**.
  3. <a href="/en/gr/26387/#fields">Add the following fields</a> to the page layout: _Recipient Email Address_, _Recipient Email Username_, _To_, _From_, _CC_, _Sent_, _Received_, _Subject_, _Attachments_, _Body_, _Body Text_, and _Message ID_.
  4. Click **Save**.

### Object Lifecycles

Next, you'll need to edit the _Case Request_ and _Case_ <a href="/en/gr/59885/">object lifecycles</a>.

#### Case Request Lifecycle

Add the following <a href="/en/gr/59885/#user-actions">user actions</a> to the **New** state with the condition _if Source equals Email_: _Recreate Case Request from Email_; _Download Original Email and Attachments_; _Change State to Email Forward_; and _Change State to Completed_. We recommend using the action names as labels.

On the **Email Forwarded** state, edit the <a href="/en/gr/47850/#Atomic_Security_Fields">_Atomic Security: Fields_</a> to change the _Default_ to **Read** for the following fields: _Created By_; _Created Date_; _External ID_; _ID_; _Last Modified By_; _Last Modified Date_; _Lifecycle_; _Lifecycle State_; _Name_; and _Status_.

Then, add the following <a href="/en/gr/59885/#entry_actions">entry actions</a>:

  * _Always_, _Change related object lifecycle state_, _Case_, change state to _Email Forwarded_, set _Conditions On Related Records_ checkbox, condition _Include related records in the following lifecycle states_, Related Record's State _New_
  * _Always_, _Change related object lifecycle state_, _Case_, change state to _Closed_, set _Conditions On Related Records_ checkbox, condition _Include related records in the following lifecycle states_, Related Record's State _New Follow-Up Email_
  * _Always_ perform actions _Forward Email_

Finally, add the <a href="/en/gr/59885/#entry_criteria">entry criteria</a> to _Always_ validate that the _Email Forwarding Address_ field _is not blank_.

#### Case Lifecycle

First, change the **Editor** and **Owner** <a href="/en/gr/36440/#howto_edit_role_permissions_on_lifecycle_states">role permissions</a> to **Edit** for the **New Follow-Up Email** state.

On the **New Follow-Up Email** state, edit the <a href="/en/gr/47850/#Atomic_Security_Fields">_Atomic Security: Fields_</a> to change the _Default_ to **Read** for the following fields: _Closed Date_; _Created By_; _Created Date_; _External ID_; _ID_; _Last Modified By_; _Last Modified Date_; _Lifecycle_; _Lifecycle State_; _Name_; _Response Sent Date_; _SLA Status_; _Status_; _Target Close Date_; and _Total Days to Close_.

Then, add the following <a href="/en/gr/59885/#user-actions">user actions</a> to the **New Follow-Up Email** state: _Change State to In Progress_, _Workflow Case Assignment Workflow_, and _Change State to Closed_. We recommend entering **Change State to In Progress**, **Assign Case**, and **Close Case** respectively as the labels.

Finally, add the following <a href="/en/gr/59885/#entry_criteria">entry criteria</a> to the **Closed** state:

  * _Always_ validate that the _State of Related Record Case Requests No records equal New_
  * _Always_ validate that the _State of Related Record Case Requests No records equal In Progress_

By default, when cases receive a follow-up email, Vault updates the _Closed Date_ field to the date when the case returns to the _Closed_ state. If desired, you can configure Vault to retain the original _Closed Date_.

<div class="note-border alert-important">
  <div class="alert alert-important" role="alert">
    <div><i class="far fa-exclamation-circle"></i></div>
    <div class="alert-text">
      <p><strong>Important</strong>: The <em>Closed Date</em> field configuration is optional.</p>
    </div>
  </div>
</div>


To configure the _Closed Date_ field, add the following entry actions to the **Closed** state:

  * _Perform with conditions_, if _Closed Date is blank_, perform actions _Update Record Field_, _Closed Date_, set to value `today()`
  * _Perform with conditions_, if _Response Sent Date is blank_, perform actions _Update Record Field_, _Response Sent Date_, set to value `today()`

On the **In Progress** state, add the following entry actions:

  * _Always_, perform actions _Change related object lifecycle state_, related object _Case Requests_, change state to _In Progress_
  * _Always_, perform actions _Update Record Field_, field _Closed Date_, set to value `null`
  * _Always_, perform actions _Update Record Field_, field _Response Sent Date_, set to value `null`

### User Notifications

Vault can send _New Email_ user notifications to either a single region or multiple regions when a new _Case Request_ record is created. If you configure notifications for a _single region_, Vault sends all _New Email_ notifications to the same user or group. If you configure notifications for _multiple regions_, Vault sends all _New Email_ notifications to a specific user or group depending on the region defined by the _Medical Inquiry_ inbound email address. For example, Vault sends notifications for inquiries sent to the address mi.uk@vernpharma.veevavault.com to a user or group in the United Kingdom.

Vault sends the user notification to the user or group in the _Editor_ role on the _Case_, _Case Request_, and _Case Response_ objects.

#### Workflow

Before Vault can send the _New Email_ notifications, you need to create a custom **New Medical Inquiry Email Received** <a href="/en/gr/30683/#create-object-lifecycles">object workflow</a> with a notification step configured as follows:

  * Label: **Notify Users**
  * Type: **Notification**
  * Next Steps: **End**
  * Message Template: **Medical Inquiry Email Received**
  * Recipient: **Editor**

Then, navigate to **Configuration > Object Lifecycles > Case Request** and, under _Event Actions_, click **Create Record**. Add the following event action: _perform with conditions_, if _Source equals Email_, perform actions _Start Workflow_, start workflow _New Medical Inquiry Email Received_.

#### Single Region Notifications

By default, Vault adds _Medical Inquiry Users_ to the _Editor_ role and _Medical Inquiry Approvers_ to the _Viewer_ role on the _Case_, _Case Request_, and _Case Response_ objects.

#### Multiple Region Notifications

To define multiple regions, you must configure <a href="/en/gr/25494/#custom-sharing-rules">custom sharing rules</a> on the _Case_, _Case Request_, and _Case Response_ objects to add the following:

  * **Medical Inquiry Region X Users** in the specified region to the **Editor** role if Vault generated the _Case Request_ from an email sent to the Region X _Medical Inquiry_ inbound email address. You'll need to add a rule for each region.
  * **Medical Inquiry Region X Approvers** in the specified region to the **Viewer** role if Vault generated the _Case Request_ from an email sent to the Region X _Medical Inquiry_ inbound email address. You'll need to add a rule for each region.

### Email Attachments

You can add the **Pull Email Attachments onto Record** action to the following objects:

  * As an entry action: _Case Request_, _Case Response_
  * As a user action: _Event_, _Case Request_, _Case Response_

This action allows Vault to pull emails, attachments, or both onto the object record. The number of attachments Medical Inquiry users can pull onto the record is constrained by the number of attachments an object can include, for which the default is 100.

### Case Contacts

By default, if the inquiring HCP's details do not match existing _Case Contact_ records, Vault leaves this field on the _Case_ blank. Medical Inquiry users must then manually create a _Case Contact_ record and select the contact on the _Case_.

To enable Vault to automatically create a new _Case Contact_ to ensure the field is not left blank on inquiry ingestion, navigate to **Admin > Settings > Application Settings** and select the **Automatically create a Case Contact when email is ingested if no match can be made** checkbox under _Medical Inquiry._

### Product Family Matching

When enabled, Vault automatically fills in the _Product Family_ on the newly created _Case Request_ record if the email includes the name of a _Product Family_ in the subject or body. If the email includes multiple _Product Family_ names, Vault sets the field to the value mentioned most frequently. Medical Inquiry users can update the field if necessary.

To enable automatic _Product Family_ matching, navigate to **Admin > Settings > Application Settings** and select the **Enable product matching on case intake** checkbox under _Medical Inquiry_.

### Local Product Matching

When enabled, Vault automatically fills in the _Local Product_ field on the newly created _Case Request_ record if the email includes the name of a _Local Product_ in the subject or body. Vault attempts to populate the _Local Product_ field and, if successful, populates the _Product Family_ field with that _Local Product_'s _Primary Product Family_. The _Local Product_ record must have a _Primary Product Family_ and the default value on the _Case Request_'s _Product Family_ field must be **`local_product__vr.primary_product_family__v`**. 

If Vault is unable to find a _Local Product_ match, it does not populate the _Local Product_ or _Product Family_ fields on the _Case Request_. If the email includes multiple _Local Product_ names, Vault sets the field to the value mentioned most frequently. Medical Inquiry users can update the field if necessary.

To enable automatic _Local Product Family_ matching, navigate to **Admin > Settings > Application Settings**, select the **Enable product matching on case intake** and **Enable Local Product matching on case intake** checkboxes under _Medical Inquiry_.

<div class="note-border alert-info">
  <div class="alert alert-info" role="alert">
    <div><i class="far fa-info-circle"></i></div>
    <div class="alert-text">
      <p><strong>Note</strong>: You may add Criteria VQL that restricts which <em>Local Products</em> or <em>Product Families</em> records users can add to the <em>Case Request</em>. If Vault finds a <em>Local Product</em> or <em>Product Family</em> record that doesn’t meet the defined Criteria VQL, the system does not send the email.</p>
    </div>
  </div>
</div>


## Configuring the Dedicated Medical Inquiry User Interface {#configuring-dedicated-interface}

The dedicated _Medical Inquiry_ user interface allows users to capture all _Case_ information on one dedicated page. Users can input information about the _Case_, _Case Contact_, and multiple _Case Requests_ and _Case Responses_. They can also capture additional information, such as _Adverse Events_. 

Once you enable the _Medical Inquiry_ user interface in your Vault, you can begin configure the fields required during inquiry intake.

To configure the **Medical Inquiry** layout:
  1. Navigate to **Admin > Configuration > Pages**.
  2. Click **Medical Inquiry**.
  3. Under _Layout_, click **Medical Inquiry Case** record.
  4. Click **Edit**.
  5. Enter a **Label**.
  6. Click **Save**.

To configure the **Case** sections:

  1. Under _Sections_, click **Case**.
  2. Click **Edit**.
  3. Enter a **Title**.
  4. Edit the **Case Fields**, adding **Fields** and **Field Keys** as desired.
  5. Click **Save**.

To configure the **Notepad** section:

  1. Under _Sections_, click **Notepad**.
  2. Click **Edit**.
  3. Enter a **Title**.
  4. Select a **Text**, **Long Text**, or **Rich Text** field on the _Case_ object for the _Notepad_.
  5. Click **Save**.

To configure the **Case Children**:

  1. Under _Sections_, click **Case Children**.
  2. Click **Edit**.
  3. Enter a **Title**.
  4. Edit the **Case Child Object Type Data**, adding **Fields** and **Field Keys** as desired.  Select a grandparent **Field Key** for grandchild objects such as _Case Response_. This is the name of the field that Vault populates as the grandparent, such as _Case_.
  5. Optional: Add child and grandchild objects. You must add each child or grandchild object separately.  For example, add email, phone, standard mail, and fax types of _Case Responses_ separately.
  6. Optional: Select the **Require save prior to adding this record** checkbox. This requires users to save all information entered to this point in the intake process. It can also be used to populate <a href="/en/gr/34072/">lookup fields</a> from child records to parent records.
  7. Click **Save**.

<div class="note-border alert-info">
  <div class="alert alert-info" role="alert">
    <div><i class="far fa-info-circle"></i></div>
    <div class="alert-text">
      <p><strong>Note</strong>: When enforcing saves, child objects may have lookup fields that reference a parent object. This lookup field must be added to the Medical Inquiry UI layout.</p>
    </div>
  </div>
</div>


{:#case-contact-section}

To configure the **Case Contact** section:

  1. Under _Sections_, click **Case Contact**.
  2. Optional: Set the **Enable Contact Section** checkbox to enable a dedicated **Case Contact** section. Enabling this section removes the _Case Contact_ field from the _Case Children_ section if previously configured.
  3. Click **Edit**.
  4. Enter a **Title**.
  5. Add **Case Contact Field Keys** as desired.
  6. Click **Save**.

You can also click **Reorder** to change the order of the records.

## Configuring the Medical-Network Connection {#medical-network-connection}

Network customers can enable the Medical-Network Connection, which allows Medical Inquiry users to search Network for healthcare professional contact details while creating a _Case Contact_.

Once the feature is enabled, navigate to **Admin > Settings > Application Settings** and, under _Medical Inquiry_, select the **Enable OpenData Account Search** checkbox. To import all HCO data and additional contact information, you must first contact Veeva Support to enable the enhanced [_Search: Case Contact_ dialog][5], and then select the **Enable Import of HCO and additional contact information** checkbox.

The _Case Contact_ field on the _Case_ and _Case Intake_ objects can be replaced with the _Case Contact_ field control on the page layout that allows users to open the _OpenData Search_ dialog.

Finally, navigate to the _OpenData Connection Authorization_ record on the connection and enter your Network credentials. The Network user entered must have API Access set to _Enabled_.

<div class="note-border alert-info">
  <div class="alert alert-info" role="alert">
    <div><i class="far fa-info-circle"></i></div>
    <div class="alert-text">
      <p><strong>Note</strong>: When cloning an environment or refreshing a sandbox, if the <em>Use Master Vault Medical Network Credentials</em> checkbox is enabled, you may need to manually activate the <em>OpenData Connection</em> and <em>OpenData Connection Authorization</em> records. You can clear and reselect the <em>Use Master Vault Medical Network Credentials</em> checkbox to refresh any missing fields.</p>
    </div>
  </div>
</div>


### Pulling Case Contact Countries from OpenData

To pull the HCP's _Country_ onto the _Case Contact_ record created from OpenData:

  1. Navigate to **Admin > Connections > Integration Rules > opendata__v**.
  2. Under _Field Rules_, click **opendata_person_country__v**.
  3. Click <i class="far fa-pencil-alt"></i>. 
  4. Set the _Status_ field to **Active**.
  5. Click **Save**.
  6. Navigate to **Admin > Configuration > Objects > Person**.
  7. Click the **Object Types** tab.
  8. Click the **Actions** menu and select **Edit Object Type Fields**.
  9. Under _Case Contact_, select the **Country** checkbox.
  10. Click **Save**.

### Constraining Case Contacts

To constrain the healthcare professionals shown to Medical Inquiry users to their _Country_ Locale, you must first navigate to **Admin > Settings > Application Settings** and select the **View only local HCP records** checkbox under _Medical Inquiry > Enable OpenData Account Search_.

To create **Country Locales**:

  1. Navigate to **Business Admin > Objects > Country Locales**.
  2. Click **Create**.
  3. Select a **Country**. This is the _Country_ on OpenData.
  4. Select a **Locale**. This is the _Locale_ of Medical Inquiry users.
  5. Click **Save**.

For example, if you select **Germany** as the _Country_ and **Germany** as the _Locale_, Medical Inquiry users in Germany will only see OpenData records where the _Country_ is _Germany_.

### Configuring Imported HCO & Additional Data

Once you configure the OpenData Connection, [enhanced _Search_ dialog][5], and [_Enable Import of HCO and additional contact information_][6] checkbox, importing an OpenData healthcare professional automatically creates related _Organization_, _Organization Information_, _Person Information_, and _Affiliation_ records. All active _Organizations_ are created and related to the _Case Contact_ record via _Affiliation_ records. Vault creates one _Organization Information_ and one _Person Information_ record per object type (_Address_, _Phone_, and _Email_) for the imported _Case Contact_ and _Organization_.

You must activate the following fields, object types, and field rules:

  * Object fields:
    * _Specialty_ (`specialty_cda__v`) on the _Person_ object
    * _Veeva ID_ (`veeva_id__v`) on the _Person Information_ object
    * _Veeva ID_ (`veeva_id__v`) on the _Affiliation_ object
  * Object types:
    * _Email_ type (_Person Information_ object)
    * _Phone_ type (_Person Information_ object)
    * _Address_ (_Person Information_ object)
    * _Email_ type (_Organization Information_ object)
    * _Phone_ type (_Organization Information_ object)
    * _Address_ type (_Organization Information_ object)
    * _Affiliation_ type (_Affiliation_ object)
  * Field rules on the _OpenData Integration Rule_ (`opendata__v`):
    * _Person: Alternate Name_ (`opendata_first_name_furigana__v`)
    * _Person: Specialty_ (`opendata_specialty_cda__v`)
    * _Person Information: Email_ (`opendata_address_email__v`)
    * _Person Information: Phone_ (`opendata_address_phone__v`)
    * _Person Information: Primary_ (`opendata_address_primary__v`)

## About the Medical-CRM Connection {#crm-connection}

Organizations using both a Medical Vault and Vault CRM on the same domain can use a standard Vault to Vault connection. The <a href="/en/gr/879896/">Medical-CRM Connection</a> enables the transfer of the following information:

  * Medical inquiries are shared from Vault CRM to your Medical Vault for fulfillment with the corresponding _Account_ and _Inquiry_ information.
  * _Case_ and _Case Request_ updates and closures in your Medical Vault are shared back to Vault CRM.
  * _Case Contact_ information in Vault CRM is matched to existing _Case Contacts_ in your Medical Vault, where data usage agreements allow.

## Configuring the Medical-Quality Vault Connection {#medquality}

Organizations with both MedInquiry and a QMS Quality Vault can exchange data using a <a href="/en/gr/53358/#Establish_Vault_to_Vault">standard Vault to Vault connection</a>. The Medical-Quality Connection transfers _Product Quality Complaint_ data from MedInquiry to QMS, which includes patient, reporter, product, and event information. This transfer creates a _Complaint Intake_ record in your QMS Quality Vault for further processing.

This section includes information on configuring the connection in MedInquiry. For more information on configuring the connection in your Quality Vault, see <a href="/en/gr/921788/">Configuring the Medical-Quality Vault Connection</a>.

### Configuring the Transfer to Quality Action

After activating the connection, you must configure the _Transfer to Quality_ action as an entry or user action on any state in the _Event_ lifecycle. The _Transfer to Quality_ action is not available for configuration if any of the _Connection_, _Integration_, or _Integration Point_ records listed is inactive.

## Configuring the Medical-Safety Vault Connection {#safmed}

Organizations with both MedInquiry and a Safety Vault can exchange data using a <a href="/en/gr/53358/#Establish_Vault_to_Vault">standard Vault to Vault connection</a>. The Medical-Safety Connection transfers _Adverse Event_ data from MedInquiry to Vault Safety, which includes patient, reporter, product, and event information. This transfer creates an _Inbox Item_ in Vault Safety for further _Case_ processing and reporting.

This section includes information on configuring the connection in MedInquiry. For more information on configuring the connection in your Safety Vault, see <a href="/en/gr/679018/">Configuring the Medical-Safety Vault Connection</a>.

### Enabling the Integration in MedInquiry

The _Adverse Event Integration_ is inactive by default. To activate this integration:

  1. Navigate to **Admin > Connections > Medical Safety Connection**.
  2. Expand the **Integrations** section.
  3. Click **Adverse Event Integration**.
  4. Select **Active** in the _Status_ field.
  5. Click **Save**.

### Configuring the Transfer to Safety Action

After activating the integration, you can configure the **Transfer to Safety** action as a <a href="/en/gr/43127/">user action</a> or an <a href="/en/gr/59885/#entry-actions">entry action</a> on any state in the _Event_ object lifecycle. When executed, this action schedules the _Adverse Event Outbound Job_ and updates the _Transfer Status_ field on the _Adverse Event_.

### Configuring the Create Event Follow Up Action

You can also configure the **Create Event Follow Up** user action on any state in the _Case_ object lifecycle. When executed on a _Case_, this action creates a new _Event_ record that is linked to the previous _Case_ and _Adverse Event_. If users perform the _Copy Record_ action on an _Adverse Event_ where the _Follow Up_ field is set to _Yes_, Vault creates the new record under the same _Case_ and linked to the source _Adverse Event_.

## Related Permissions

Users must have a security profile that grants _Admin: Objects: Create_ and _Edit_ permissions on the _Case_, _Case Request_, _Case Response_, _Case SLA_, _Fulfillment Document_, _Case Contact_, and _Person Address_ objects to perform common <a href="/en/gr/52722/">Medical Inquiry tasks</a>. The configuration migration package provides the _Medical Inquiry User_ and _Medical Inquiry Approver_ security profiles as examples.

You can complete all steps in this article with the standard System Admin or Vault Owner security profile. If your Vault uses custom security profiles, your profile must grant the following permissions:

| Type | Permission Label | Controls |
| --- | --- | --- |
| Security Profile | Admin: Configuration: Objects: Create | Ability to create new Vault objects. |
| Security Profile | Admin: Configuration: Objects: Edit | Ability to make changes to Vault objects. |
| Security Profile | Admin: Configuration: Object Lifecycles: Create | Ability to create new object lifecycles. |
| Security Profile | Admin: Configuration: Object Lifecycles: Edit | Ability to make changes to existing object lifecycles. |
| Security Profile | Admin: Configuration: Object Workflows: Create | Ability to create new object workflows. |
| Security Profile | Admin: Configuration: Object Workflows: Edit | Ability to make changes to existing object workflows. |
| Security Profile | Admin: Configuration: Outbound Email Domains: Read | Ability to view the _Outbound Email Domains_ page. |
| Security Profile | Admin: Configuration: Outbound Email Domains: Create, Edit, Delete | Ability to create, edit, and delete Outbound Email Domains. |
| Security Profile | Admin: Pages: All Configuration | Ability to configure the Medical Inquiry user interface. |
| Security Profile | Object: Case: Create, Read, Edit, Delete | Ability to create, read, edit, and delete _Case_ object records in the dedicated Medical Inquiry user interface. |
| Security Profile | Object: Case Contact: Create, Read, Edit, Delete | Ability to create, read, edit, and delete _Case Contact_ object records in the dedicated Medical Inquiry user interface. |
| Security Profile | Object: Case Request: Create, Read, Edit, Delete | Ability to create, read, edit, and delete _Case Request_ object records in the dedicated Medical Inquiry user interface. |
| Security Profile | Object: Event: Create, Read, Edit, Delete | Ability to create, read, edit, and delete _Event_ object records in the dedicated Medical Inquiry user interface. |
| Security Profile | Object: Case Response: Create, Read, Edit, Delete | Ability to create, read, edit, and delete _Case Response_ object records in the dedicated Medical Inquiry user interface. |
| Security Profile | Object: Case Response Email Template: Create, Read, Edit, Delete | Ability to create, read, edit, and delete _Case Response Email Template_ object records. |
| Security Profile | Object: Frequently Asked Question: Create, Read, Edit, Delete | Ability to create, read, edit, and delete _Frequently Asked Question_ object records. |
| Security Profile | Object: Fulfillment Document: Create, Read, Edit, Delete | Ability to create, read, edit, and delete _Fulfillment Document_ object records. |
| Security Profile | Object: Standard Response: Create, Read, Edit, Delete | Ability to create, read, edit, and delete _Standard Response_ object records. |
| Security Profile | Object: Medical Inquiry Keyword: Create, Read, Edit, Delete | Ability to create, read, edit, and delete _Medical Inquiry Keyword_ object records. |
| Security Profile | Object: Conversation: Create, Read, Edit, Delete | Ability to configure telephony support. |
| Security Profile | Pages: Medical Inquiry: Medical Inquiry: View | Ability to view and use the dedicated Medical Inquiry user interface. This permission is necessary for Medical Inquiry Users. |

[1]: #credentials
[2]: #safmed
[3]: #acknowledgement-emails
[4]: #medinq-email-intake-page-layout-config
[5]: #enhanced-hco-search
[6]: #medical-network-connection