# Creating Unclassified Documents

You can create unclassified documents by dragging and dropping them to your **Document Inbox** or by uploading them via the **Create** button. Vault sets the document type on these documents to Unclassified.

<div class="note-border alert-info">
  <div class="alert alert-info" role="alert">
    <div><i class="far fa-info-circle"></i></div>
    <div class="alert-text">
      <p><strong>Note</strong>: Contact Veeva Support to enable the <strong>Document Inbox</strong> and unclassified documents in your Vault. This functionality is automatically available in most Clinical Operations, Quality, and RIM Vaults, but must be enabled for other applications.</p>
    </div>
  </div>
</div>


## Drag & Drop to Document Inbox

You can drag and drop up to 250 supported files from your computer directly into your **Document Inbox** at once. While Vault uploads the files, you can drag and drop additional files into your **Document Inbox** or navigate to other pages in your Vault while monitoring the progress in a [status dialog][1].


### Upload Status

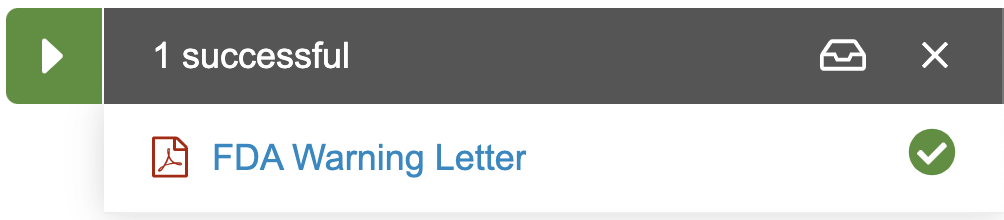
When Vault begins to upload files that you've dragged into your **Document Inbox**, you'll see a dialog in the bottom right of the screen that lists the status of all files you are uploading to Vault. While Vault is working on uploading your files, you are free to perform any other operations within Vault. Click the inbox icon (<img class="inline" src="https://platform.veevavault.help/assets/images/inbox-icon-21r14.png" alt="Inbox Icon" style="" />) in the status dialog to return to your **Document Inbox** from anywhere in Vault.

Click on the arrow icon (<img class="inline" src="https://platform.veevavault.help/assets/images/arrow_icon_20r34.png" alt="Arrow Icons" style="" />) to open or close the status dialog. Note that the dialog will re-open if you drag and drop additional documents into the **Document Inbox** when Vault is still processing a previous file upload.

<a href="https://platform.veevavault.help/assets/images/Navigate_to_Inbox_21r1.4-3.png" data-lightbox="Navigate_to_Inbox_21r1.4-3.png" data-title="" data-alt="Navigate to Inbox">
  <img class="docimage" src="https://platform.veevavault.help/assets/images/Navigate_to_Inbox_21r1.4-3.png" alt="Navigate to Inbox" style=""  />
</a>

<div class="note-border alert-info">
  <div class="alert alert-info" role="alert">
    <div><i class="far fa-info-circle"></i></div>
    <div class="alert-text">
      <p><strong>Note</strong>: You cannot upload folders to the Document Inbox. In Internet Explorer (IE11), Vault does not display the failed creation in the status dialog for any folders you attempt to upload.</p>
    </div>
  </div>
</div>


#### Status Icons

The arrow icon's color indicates the status of the total number of files that you dragged and dropped into your **Document Inbox** since the status dialog was last opened.

<table class="wbord" style="width: 712px; height: 342px;">
  <tr>
    <td style="width: 53px;">
      <strong>Icon</strong>
    </td>
    <td style="width: 198px;">
      <strong>Displayed</strong>
    </td>
    <td style="width: 439px;">
      <strong>Description</strong>
    </td>
  </tr>
  <tr>
    <td style="width: 53px; text-align: left;">
      <img class="inline" src="https://platform.veevavault.help/assets/images/status_progress_open_20r34.png" alt="Status Progress Open" style="" />
    </td>
    <td style="width: 198px;">
      When status dialog is open
    </td>
    <td style="width: 439px;">
      File upload is in progress
    </td>
  </tr>
  <tr style="height: 38px;">
    <td style="width: 53px; height: 38px; text-align: left;">
      <img class="inline" src="https://platform.veevavault.help/assets/images/status_progress_closed_20r34.png" alt="Status Progress Closed" style="" />
    </td>
    <td style="width: 198px; height: 38px;">
      When status dialog is closed
    </td>
    <td style="width: 439px; height: 38px;">
      File upload is in progress
    </td>
  </tr>
  <tr style="height: 47px;">
    <td style="width: 53px; height: 47px; text-align: left;">
      <img class="inline" src="https://platform.veevavault.help/assets/images/status_complete_open.png" alt="Status Complete Open" style="" />
    </td>
    <td style="width: 198px; height: 47px;">
      When status dialog is open
    </td>
    <td style="width: 439px; height: 47px;">
      File upload is complete, and all documents were created successfully
    </td>
  </tr>
  <tr style="height: 48px;">
    <td style="width: 53px; height: 48px; text-align: left;">
    <img class="inline" src="https://platform.veevavault.help/assets/images/status_complete_closed.png" alt="Status Complete Closed" style="" />
    </td>
    <td style="width: 198px; height: 48px;">
      When status dialog is closed
    </td>
    <td style="width: 439px; height: 48px;">
      File upload is complete, and all documents were created successfully
    </td>
  </tr>
  <tr style="height: 47px;">
    <td style="width: 53px; height: 47px; text-align: left;">
    <img class="inline" src="https://platform.veevavault.help/assets/images/status_failure_open_20r34.png" alt="Status Failed Open" style="" />
    </td>
    <td style="width: 198px; height: 47px;">
      When status dialog is open
    </td>
    <td style="width: 439px; height: 47px;">
      File upload is complete, but one or more documents failed to create
    </td>
  </tr>
  <tr style="height: 47px;">
    <td style="width: 53px; height: 47px; text-align: left;">
    <img class="inline" src="https://platform.veevavault.help/assets/images/status_failure_closed_20r34.png" alt="Status Failed Closed" style="" />
    </td>
    <td style="width: 198px; height: 47px;">
      When status dialog is closed
    </td>
    <td style="width: 439px; height: 47px;">
      File upload is complete, but one or more documents failed to create
    </td>
  </tr>
</table>

### Canceling Document Upload

You can cancel a bulk file upload at any time. To cancel an upload, click on the **X** icon in the top right of the status dialog. Then, click on the **X** icon again to confirm the cancelation. This only cancels the upload of files that had not finished uploading at the time. For example, if you were creating 50 documents and 35 files had finished uploading before you cancel the upload, Vault would still create unclassified documents for the 35 uploaded files.

Clicking on the **X** icon after all uploads are complete removes the status dialog from your view.

Note that closing your internet browser, closing your browser tab, or refreshing your page before file upload is complete cancels all remaining uploads.

### Limitations

The following limitations affect uploading unclassified documents to your Document Inbox:

* There is a maximum of 250 files per drop
* Files must be under 4GB
* You cannot upload zero (0) byte files
* Filenames cannot exceed 218 bytes
* The file must be a <a href="/en/gr/25210/">supported format type</a>
* If you're using Internet Explorer, we recommend using newer versions (V11+) as we cannot guarantee the **Document Inbox** drag and drop functionality in older versions

## Creating Unclassified Documents via the Create Button {#upload}

You can also create unclassified documents in the same way as you <a href="/en/gr/15085/">create other documents with an uploaded source file</a>. From the _Upload Files_ page, select **Classify documents later** to bypass the steps to select a document type and populate fields. You must have the <a href="/en/gr/15020/#permissions">appropriate permissions</a> to display the _Classify documents now_ and _Classify documents later_ options on the _Upload Files_ page. 


 [1]: #upload-status