Medical Inquiry CRM Data Sharing allows you to share account and Medical Inquiry data between Veeva CRM and Veeva MedInquiry. For example, when a sales representative creates an inquiry in CRM, MedInquiry pulls the inquiry from CRM to create a Case in Vault, which a call center agent responds to using MedInquiry to generate a response package. When the agent closes the case in MedInquiry, Vault pushes an update, which can include response notes and a link to the response package, back to CRM.
For inquiries that originate in MedInquiry, such as a health care provider requesting information directly from a call center, Vault creates a MedInquiry Medical Inquiry record in CRM if the Case Contact is associated with a CRM Account.
Vault uses the following objects to pull and store data from Veeva CRM:
- CRM Org: The CRM Org object stores login credentials, API credentials, and integration and initial sync history for a specific CRM organization.
- CRM Data Mapping: This object creates a field to field mapping between Vault and Veeva CRM.
To use Medical Inquiry CRM Integration, you must have a security profile that grants access and complete the following steps, explained in detail in the sections below:
- Enable Medical Inquiry CRM Data Sharing
- Create a CRM Org
- Add the API Consumer Key and Consumer Secret
- Enter Salesforce Credentials
- Populate the CRM Data Mappings Object
- Execute the Pull Historical CRM Accounts Job
Enabling Medical Inquiry CRM Data Sharing
You must contact Veeva Support to enable this feature, then navigate to Admin > Settings > Application Settings and select the Enable Medical Inquiry CRM Data Sharing checkbox.
Creating the CRM Org
Before You Begin
Vault uses the CRM Org record to store login credentials and other information it needs to retrieve data from Veeva CRM. Before you begin, you’ll need to create a dedicated integration user account in Veeva CRM for MedInquiry integration. You’ll assign all cases you want to pull into MedInquiry to this user. Next, find or create a connected app and gather the following information from Veeva CRM:
- From Company Information, save the Org Name and Org ID.
- From Setup > App Setup > Create > Apps > Remote API Access, save the Consumer Key and Consumer Secret.
- The Veeva CRM Username and Password for your dedicated integration user.
Adding CRM Orgs to Business Admin
Navigate to Admin > Configuration > Objects > CRM Org and select the Display in Business Admin menu checkbox.
How to Create a CRM Org Record
To create a new CRM Org record:
- Navigate to Business Admin > Objects > CRM Org and click Create.
- Enter the value of the Org Name field you saved from Salesforce in the Name field.
- Enter the value of the Org ID field you saved from Salesforce in the CRM Org ID field.
- From the Integrations dropdown, select Medical Inquiry.
- Optional: Select the Type of CRM Org for the integration, Sandbox or Production.
- Select the CRM Vault Metadata Sync checkbox.
- In the CRM Username field, enter the username you use to log into your CRM Org in Veeva CRM.
- Click Save.
Adding the API Consumer Key and Secret
From the Actions menu, select Enter Salesforce Credentials. Enter the CRM Password, Connected App Consumer Key, and Connected App Consumer Secret that you saved from your Veeva CRM connected app.
Populating the CRM Data Mappings Object
The CRM Data Mapping object specifies the field to field mappings between Vault and Veeva CRM along with the picklist translations. You can configure data mappings manually or use Vault Loader to upload a CSV.
Configuring Data Mappings with Vault Loader
To upload a CSV of your data mappings:
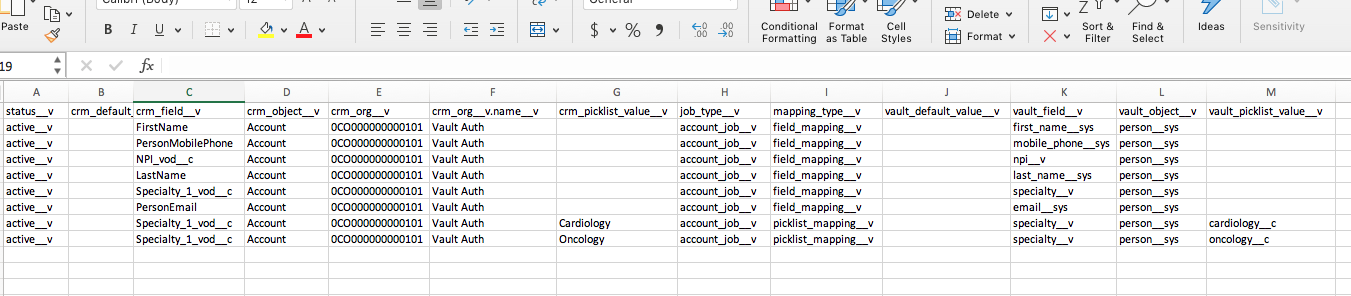
- Navigate to Vault Loader > Load and click Choose next to CSV File, then select your data mappings file. See the sample CSV below for an example.
- Select CRM Data Mappings from the Object Type picklist.
- From the Action Type picklist, select Create.
- Click Map Fields. Vault will notify you via email when the loader job is complete.
Configuring Data Mappings Manually
To configure field mapping manually:
- Navigate to the CRM Data Mappings list page and click Create.
- Select the Job Type. Select Account to map data from the CRM Account object. To map data from the CRM Inquiry object, select Inquiry.
- Select the Mapping Type from the Mapping Type picklist.
- Enter the CRM object name and the corresponding Vault object name. For example, the CRM Account object can be mapped to the Vault Person(person__sys) object.
- Enter the CRM Field name and the corresponding Vault Field name. For example, the CRM FirstName field can be mapped to the Vault First Name(first_name__sys) field.
- For picklist fields, enter the CRM Picklist Value and the corresponding Vault Picklist Value. For example, cardiology and cardiology__c.
- Optional: Enter the CRM Default Value and Vault Default Value. For fields that do not map directly to a CRM field, Vault creates records with the default value.
- Click Save.
About Mapping Types
There are four (4) options available in the Mapping Type picklist:
- CRM Default Mapping: This mapping type defines default values for CRM fields that do not exist in Vault. The CRM Default Value field is required for this mapping type.
- Vault Default Mapping: This mapping type defines default values for Vault fields that do not exist in CRM. The Vault Default Value field is required for this mapping type.
- Field Mapping: This mapping type configures mapping between a Vault field and a CRM field for all field types except picklists
- Picklist Mapping: This mapping type configures mapping between a Vault picklist/object value and a CRM picklist/object value. You must configure one mapping for each value in a picklist/object. Picklist/objects must be mapped 1:1 between Vault and CRM. Every value in each system must be mapped once.
Pulling Account Data from Veeva CRM
You can choose to import all CRM account records or only account records created after a certain date. From the CRM Org record detail page, click Edit. Select the desired Integration Start Date for Accounts.
From the Actions menu on the CRM Org record detail page, select the Pull Historical CRM Accounts action. Vault notifies you when the job is complete. After the initial sync, Vault populates the Initial Sync Start Date and Initial Sync Complete Date for Accounts. The records from CRM are then available in the corresponding Vault Case Contact object records listing. Once the initial Pull Historical CRM Accounts job runs, Vault pulls new and modified Account records using a scheduled job on a periodic basis.
Syncing Only Accounts with a Medical Inquiry
There are situations where you may not wish to sync all Accounts from Veeva CRM into Vault. For example, your organization may have a limited third party agreement (TPA) from a data provider that constrains the quantity of HCP reference data you can pull from Veeva CRM into Vault.
If this is the case, you can contact Veeva Support to enable the Only Pull Accounts with Inquiries feature.
With this setting are enabled, Vault:
- Does not need to pull historical accounts before pulling inquiries.
- Does not add the Pull Historical CRM Inquiries job or action to the CRM Org.
- Updates the Recurring Account Pull job to only query Veeva CRM for Accounts if a user created a Medical Inquiry since the last successful job.
Merged Accounts
To support Accounts merged in CRM, set the Enable Account Merge checkbox under Admin > Settings > Application Settings > Enable Medical Inquiry CRM Data Sharing. This is only available on Vaults with the CRM Data Sharing feature enabled. If you do not see the checkbox, please contact Veeva Support.
When an account merges, Vault records the merge in the Merged Contact object and updates any open Case records associated with a merged account with the new Case Contact of the newly merged account. Vault sets the Case Contact account that was merged into said account to inactive. Vault does not inactivate the account if the Person object uses a lifecycle.
You cannot use merged Case Contacts in Case records.
Pulling Medical Inquiries
You can choose to integrate all CRM Medical Inquiry records or only inquiry records created after a certain date. From the CRM Org record detail page, click Edit. Select the desired Integration Start Date for Inquiry.
To pull records from Veeva CRM, from the Actions menu on the CRM Org record detail page, select the Pull Historical CRM Inquiries action. Vault notifies you when the job is complete. After the initial sync, Vault populates the Initial Sync Start Date and Initial Sync Complete Date for Inquiries. The records from CRM are available in the corresponding Case and Case Request Vault object records listing. Once the initial Pull Historical CRM Inquiries job runs, Vault pulls new and modified Inquiry records using a scheduled job on a periodic basis. Inquiries are pulled for the window between the last successful Recurring Account Pull job’s query time, before the last successful Recurring Inquiry Pull job.
The Recurring Inquiry Pull job relies on the Recurring Account Pull job completing successfully. You must therefore monitor and maintain it to ensure Vault continues to pull Inquiries.
We recommend both jobs run hourly to minimize the maximum window between Inquiry pulls with a gap between them, as they cannot run simultaneously. For example, you can schedule the Recurring Account Pull job at HH:00 and the Recurring Inquiry Pull job at HH:15. You must configure the job times with the API.
Note: MedInquiry only pulls inquiries assigned to the designated integration user in Veeva CRM.
Pulling Custom Response Details
By default, Vault sends Case Response emails for Cases synced from Veeva CRM to the Case Contact, synced from the Account in Veeva CRM. You can allow users to specify another email address, similar to a Response Contact, to send the Case Response email to instead.
To configure the additional Email Address, you’ll first need to activate the Email Address field on the Case and Case Response objects, then add the fields to both object page layouts.
Next, you’ll need to add the Email Address field to the Email object type of the Case Response object. You must also set the default on this Email Address field to case__vr.email_address__v.
Finally, you’ll need to create a field mapping between email_vod__c on the Medical Inquiry object in Veeva CRM and email_address__v on the Case object in MedInquiry. This ensures that the email address specified in the Medical Inquiry record in Veeva CRM is pushed to the Email Address field on the relevant Case record in MedInquiry.
You can optionally create workflows and user actions to update these fields on Cases and Case Responses.
Pushing Medical Inquiries
To push records from MedInquiry to Veeva CRM, select Push CRM Inquiries from the Actions menu on the CRM Org record detail page. Vault notifies you when the job is complete and the records from MedInquiry will be available in Veeva CRM. Once the initial Push Inquiries job completes, Cases that are closed in MedInquiry and assigned to a Case Contact pulled from Veeva CRM are pushed to CRM by a scheduled job on a periodic basis.
Pushing Updates Only to Inquiries Originating in Veeva CRM
The push job can be constrained to only push inquiries that originated in Veeva CRM back to CRM. To enable this, select the Only Push Inquiries that Originate in CRM in Admin > Settings > Application Settings. When this setting is enabled, new inquiries created in Vault are not pushed to Veeva CRM.
Related Permissions
You can complete all steps in this article with the standard System Admin or Vault Owner security profile. If your Vault uses custom security profiles, your profile must grant the following permissions:
| Type | Permission Label | Controls |
|---|---|---|
| Security Profile | Admin: Configuration: Objects: Create | Ability to create new Vault objects. |
| Security Profile | Admin: Configuration: Objects: Edit | Ability to make changes to Vault objects. |
| Security Profile | Admin: Configuration: Object Lifecycles: Create | Ability to create new object lifecycles. |
| Security Profile | Admin: Configuration: Object Lifecycles: Edit | Ability to make changes to existing object lifecycles. |
| Security Profile | Admin: Configuration: Object Workflows: Create | Ability to create new object workflows. |
| Security Profile | Admin: Configuration: Object Workflows: Edit | Ability to make changes to existing object workflows. |